If you're rocking a fabulous set of false nails but are ready for a change, it's important to know how to take false nails off with acetone safely and effectively. While fake nails can enhance your look, switching up your manicure means they eventually need to come off. The good news is that with the right approach, you can remove them at home without damaging your natural nails. This comprehensive guide will walk you through every step, ensuring a smooth and gentle removal process.
Knowing how to remove artificial nails with acetone at home is a valuable skill, especially when you want to avoid the time and expense of a salon visit. Whether you've adorned your nails with beautiful acrylics or gel extensions, proper removal is crucial for maintaining the health and integrity of your natural nail bed. Let's get one thing out of the way: removing fake nails at home safely and effectively requires patience and the right techniques to avoid destroying your nails. This isn't just about getting them off; it's about preserving the canvas beneath for your next stunning manicure.
Table of Contents
- Understanding False Nails and Why Safe Removal Matters
- The Science Behind Acetone: How It Works on False Nails
- Gathering Your Essential Tools for Acetone Nail Removal
- Step-by-Step Guide: How to Take False Nails Off with Acetone Safely
- Troubleshooting Common Issues During False Nail Removal
- When to Seek Professional Help: Rachel's Nails and Beyond
- Caring for Your Natural Nails After False Nail Removal
- Debunking Myths and Ensuring Safe Practices
Understanding False Nails and Why Safe Removal Matters
False nails, often referred to as fake nails, encompass a variety of nail enhancements, including acrylics, gels, and even simple press-ons. They are designed to add length, strength, and aesthetic appeal to your natural nails. Acrylic nails, for instance, are created by combining a liquid monomer and a powdered polymer to form a hard protective layer over your natural nails. Gel nails, on the other hand, are typically cured under UV or LED light, offering a flexible yet durable finish. While they can be stunning and provide a long-lasting manicure, their removal requires a specific process to prevent damage to your underlying natural nails.
Improper removal techniques, such as picking, peeling, or forcibly pulling off false nails, can lead to significant harm. This includes thinning of the nail plate, breakage, splitting, and even severe damage to the nail bed, which can be painful and may take months to heal. Your natural nails are delicate, and the adhesive or material used to secure false nails is incredibly strong. Therefore, understanding the correct method for how to take false nails off with acetone is not just about convenience; it's about preserving the health and strength of your natural nails for future manicures. By following the proper steps and taking care of your nails, you ensure they remain healthy and beautiful.
The Science Behind Acetone: How It Works on False Nails
Acetone is a powerful organic solvent widely used in the beauty industry, particularly for nail polish and false nail removal. Chemically, it's a colorless, volatile, and flammable liquid with a distinctive pungent odor. Its effectiveness lies in its ability to dissolve various organic compounds, including the polymers and resins found in acrylic and gel nail products, as well as the adhesives used for press-on nails. When false nails are exposed to acetone, the solvent penetrates the material, breaking down its molecular structure. This process softens the hard, rigid nail enhancement, turning it into a gummy, pliable substance that can be gently removed.
It's crucial to use 100% pure acetone for false nail removal, as diluted versions or non-acetone removers are generally not strong enough to effectively break down the robust materials of acrylics or gels. While acetone is highly effective, it can also be drying to the skin and nails due to its solvent properties. It strips away natural oils, which is why proper post-removal care, including hydration and moisturizing, is essential. Understanding this chemical action helps you appreciate why patience is key during the soaking process and why protecting your skin is a vital preparatory step. The goal is to let the acetone do its work, not to force the nails off prematurely.
Gathering Your Essential Tools for Acetone Nail Removal
Before you begin the process of how to take false nails off with acetone, it’s important to gather all the necessary supplies. Having everything at hand will make the removal process smoother, more efficient, and ultimately, safer for your nails. Here's a checklist of what you'll need:
- 100% Pure Acetone: This is non-negotiable. Do not use diluted or non-acetone removers, as they won't be effective for acrylics or gels.
- Cotton Balls or Cotton Pads: You'll need enough to cover each nail.
- Aluminum Foil: Cut into 10 small squares, large enough to wrap around each fingertip. Alternatively, a shallow bowl for soaking.
- Nail File (Coarse and Fine Grit): A coarse file is for filing down the top coat, and a finer one for shaping and smoothing your natural nails afterward.
- Cuticle Pusher: Essential for gently pushing off the softened nail material. (As per "Use a cuticle pusher to remove your fake nails" and "Use a cuticle pusher to gently push off the softened.")
- Buffer Block: For smoothing the surface of your natural nails post-removal.
- Cuticle Oil: To rehydrate and nourish your cuticles and nail beds. (Referencing "Once you learn how to remove acrylic false nails at home you can take care of your natural nails by hydrating and moisturising your nail bed, cuticles, and fingers with cuticle oil.")
- Hand Lotion or Petroleum Jelly: To protect the skin around your nails from the drying effects of acetone.
- Small Towel: To protect your work surface.
- Ventilated Area: Acetone fumes can be strong; ensure good air circulation.
Having these items ready will ensure you can proceed without interruptions, making the process of how to take false nails off with acetone as seamless as possible.
Step-by-Step Guide: How to Take False Nails Off with Acetone Safely
Now that you have all your tools ready, let's dive into the detailed steps for safely removing your false nails using acetone. This process requires patience, but following each step carefully will yield the best results and protect your natural nails.
Preparation is Key: Filing and Protecting Your Skin
The first crucial step in learning how to take false nails off with acetone is proper preparation. Begin by using a coarse nail file to gently file down the top layer of your false nails. If you have a gel topcoat, this step is particularly important as it helps to break the seal and allows the acetone to penetrate more effectively. File off any polish, topcoat, or decorative elements until the false nail material itself is exposed and slightly scuffed. Be careful not to file down to your natural nail. This initial filing significantly speeds up the soaking process.
Next, protect the delicate skin around your nails from the drying effects of acetone. Apply a generous amount of petroleum jelly, cuticle oil, or a thick hand cream to your cuticles and the skin surrounding each nail. Acetone can be very harsh on the skin, causing dryness and irritation. This protective barrier will minimize direct contact with the acetone, keeping your skin hydrated and healthy throughout the removal process. This simple step is often overlooked but is vital for a comfortable and safe experience when you're trying to figure out how to take false nails off with acetone.
The Soaking Method: Bowl vs. Foil Wrap
There are two primary methods for soaking your nails in acetone: the bowl method and the foil wrap method. Both are effective, but one might suit your preference better.
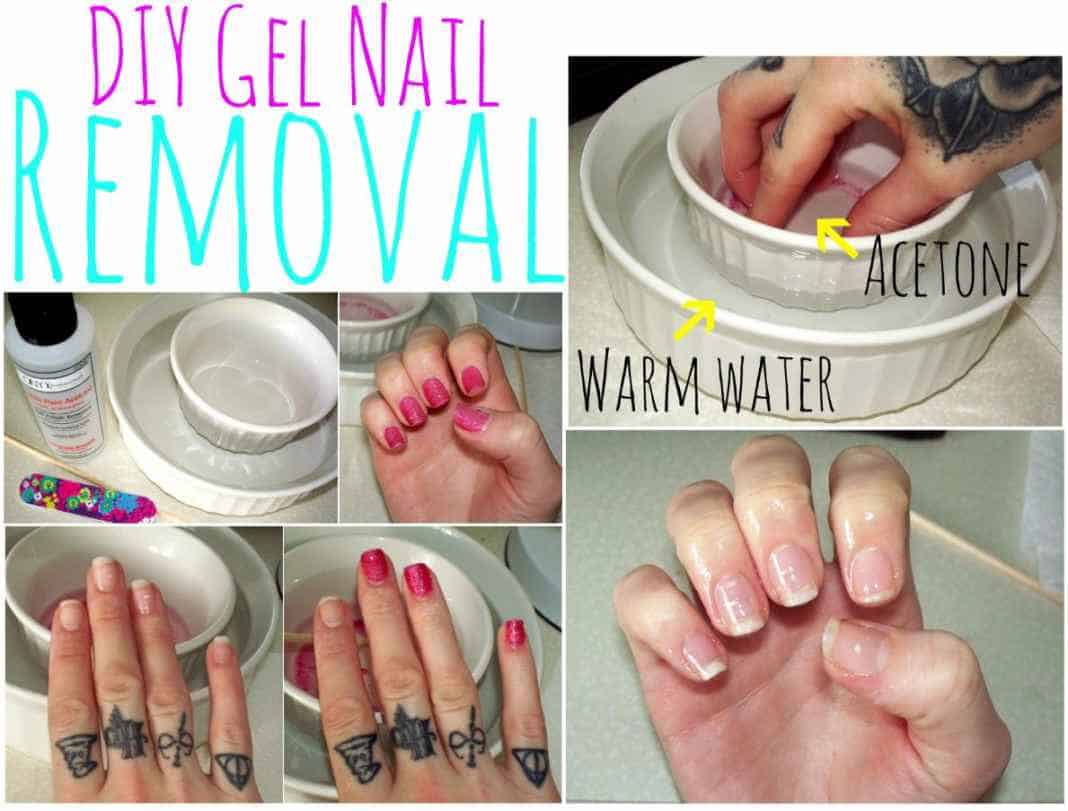
The Bowl Method: To use acetone to remove nails, first, pour acetone into a shallow bowl. Ensure the bowl is made of glass or ceramic, as acetone can react with certain plastics. Submerge your nails into the solution for a few minutes. You can soak one hand at a time, or both if you have a large enough bowl. The advantage of this method is that it ensures full saturation of the false nail. However, it exposes more of your skin to acetone fumes and the liquid itself, which can be drying. Joyce teaches viewers how to remove fake nails by using acetone, often demonstrating this direct soaking technique. First, you should get acetone solution and submerge your nails into the solution for a few minutes and the nails will come off by themselves, or at least become very soft.
The Foil Wrap Method: This method is often preferred for its targeted approach and reduced skin exposure. Start by soaking a cotton ball or cotton pad thoroughly with 100% pure acetone. Place the saturated cotton directly on top of your false nail, ensuring it covers the entire surface. Then, take a pre-cut piece of aluminum foil and tightly wrap it around your fingertip, securing the cotton ball in place. Repeat this for all ten nails. The foil helps to create a warm, enclosed environment, which enhances the acetone's effectiveness and prevents it from evaporating too quickly. This method allows you to move more freely while your nails are soaking.
Regardless of the method chosen, patience is paramount. Allow your nails to soak for 15-20 minutes initially. For very stubborn or thick false nails, you might need to soak for longer or repeat the process. Resist the urge to pick or pull at the nails during this time. The acetone needs sufficient time to break down the material completely. Check one nail after the initial soaking period; if it's not soft and gummy, re-wrap or re-submerge for another 5-10 minutes.
Gentle Removal with a Cuticle Pusher
Once your false nails have softened considerably from the acetone soak, it's time for the removal phase. This is where your cuticle pusher comes into play. Gently unwrap one finger (if using the foil method) or remove your hand from the bowl. Immediately, while the nail is still soft and pliable, use a cuticle pusher to gently push off the softened material. Start from the cuticle area and work your way towards the free edge. You should see the false nail material crumbling or flaking off with minimal effort. Remember, the goal is gentle pressure, not forceful scraping.
If you encounter any resistance or if a section of the false nail isn't coming off easily, do not force it. Forcing the removal will undoubtedly damage your natural nail underneath. Instead, re-soak that particular nail for another 5-10 minutes. The key to how to take false nails off with acetone successfully is patience and allowing the solvent to do its job completely. Continue this process, one nail at a time, until all the false nail material has been removed. You might notice some residue left behind; a gentle buffing with a fine-grit buffer block can help remove any remaining bits without harming your natural nail.
Post-Removal Care: Nurturing Your Natural Nails
After successfully removing all the false nail material, your natural nails will likely feel dry and possibly a bit brittle due to the acetone exposure. This is a critical stage for nail health. Begin by washing your hands thoroughly with soap and water to remove any remaining acetone residue. Then, it's time to rehydrate and moisturize. Learn how to remove acrylic nails with acetone with this guide from wikihow, and you'll find that post-removal care is just as important as the removal itself. Once you learn how to remove acrylic false nails at home you can take care of your natural nails by hydrating and moisturising your nail bed, cuticles, and fingers with cuticle oil.
Apply a generous amount of high-quality cuticle oil to each nail, focusing on the cuticle area and the nail plate itself. Massage it in gently to stimulate blood flow and help the oil penetrate. Follow this with a rich hand cream or lotion, massaging it into your hands and fingers. This replenishes the moisture stripped away by the acetone. You might also consider applying a nail strengthener or a clear protective polish to add an extra layer of defense to your now vulnerable natural nails. Giving your nails a break from extensions and focusing on hydration for a few weeks is highly recommended to allow them to fully recover and regain their strength.
Troubleshooting Common Issues During False Nail Removal
Even with the best preparation and technique, you might encounter a few common hurdles when learning how to take false nails off with acetone. Don't worry, these are usually easy to resolve with a little extra patience and adjustment.
- Nails Not Softening Enough: If, after the recommended soaking time, your false nails still feel hard or only partially softened, it's a clear sign they need more time. Re-soak for an additional 5-10 minutes. For very thick or stubborn acrylics, you might even need to repeat the entire soaking process. Ensure your acetone is 100% pure, as diluted versions won't be effective. Also, make sure the cotton pads are thoroughly saturated and the foil wraps are tight to prevent evaporation.
- Stubborn Residue Left Behind: Sometimes, even after the bulk of the false nail is removed, a thin, gummy layer or small bits of material might remain on your natural nail. Do not pick or scrape aggressively. Instead, gently buff the surface with a fine-grit buffer block. If it's still resistant, apply a fresh acetone-soaked cotton pad to that specific area for a few more minutes, then try buffing again.
- Skin Irritation or Dryness: Acetone is very drying. If you experience excessive dryness, redness, or mild irritation around your cuticles, it means your protective barrier (petroleum jelly/cuticle oil) wasn't sufficient, or you were exposed for too long. Immediately wash your hands thoroughly, apply more cuticle oil and a rich moisturizer, and consider taking a break before attempting further removal. Ensure you're working in a well-ventilated area to minimize fume inhalation.
- Filing Too Much: If you accidentally file into your natural nail during the initial filing or the post-soak buffing, stop immediately. This can thin and weaken your nail. Be mindful of the pressure you apply and the grit of your file. If damage occurs, focus heavily on moisturizing and strengthening your natural nails in the weeks that follow.
Remember, patience and gentleness are your best friends throughout this process. Forcing anything will only lead to damage, defeating the purpose of a safe at-home removal.
When to Seek Professional Help: Rachel's Nails and Beyond
While knowing how to take false nails off with acetone at home is a valuable skill, there are times when it's simply better to leave it to the professionals. Sometimes, taking off fake nails is too difficult, or you might be dealing with a particularly stubborn or complex set of extensions. This is where professional nail technicians, like those at Rachel's Nails, come in. They are trained experts who can perform removals safely and efficiently, often using professional-grade acetone and specialized tools.
The best way to remove acrylic nails is by visiting a nail tech, especially if you're concerned about damaging your natural nails. Professional salons, such as Rachel's Nails, state, "We remove false with professional acetone." They have access to higher-grade products and techniques that might not be available for home use. Moreover, a professional can assess the condition of your natural nails and provide immediate, tailored aftercare advice. You should consider professional removal if:
- You have very thick or multiple layers of false nails that are proving difficult to soften at home.
- You notice any signs of nail infection (redness, swelling, pus, pain) under or around your false nails. Attempting to remove them yourself in this situation could worsen the infection.
- Your natural nails are already severely damaged or weak, and you're worried about causing further harm.
- You simply don't have the time or patience to perform the removal yourself.
- You've tried the at-home method and are experiencing persistent difficulty or discomfort.
Investing in a professional removal can save you from potential pain, damage, and costly repairs to your natural nails in the long run. It’s always better to err on the side of caution when it comes to your nail health.
Caring for Your Natural Nails After False Nail Removal
Once you've successfully learned how to take false nails off with acetone, the journey isn't over. The period immediately following removal is crucial for the recovery and strengthening of your natural nails. How can I care for my natural nails after removing fake nails? The key is consistent hydration, protection, and patience.
- Hydrate and Moisturize Religiously: As mentioned, acetone strips away natural oils. Apply cuticle oil multiple times a day to your nail beds and cuticles. Follow up with a rich hand cream. This will help restore moisture, prevent brittleness, and promote healthy growth.
- Give Them a Break: Resist the urge to apply new false nails or even regular polish immediately. Allow your natural nails a breathing period, ideally a few weeks, to fully recover and strengthen. This break is vital for their long-term health.
- Gentle Filing and Buffing: Trim your nails short to minimize breakage. Use a fine-grit nail file to gently smooth any rough edges. Avoid harsh buffing, as this can further thin the nail plate. A very gentle buff can help remove any remaining ridges or unevenness.
- Nail Strengtheners: Consider using a good quality nail strengthener or a clear base coat designed to fortify weak nails. Look for products containing ingredients like keratin or calcium.
- Protect Your Hands: When doing household chores, gardening, or washing dishes, wear gloves to protect your nails from harsh chemicals and excessive water exposure, which can further weaken them.
- Healthy Diet: Your nail health is also influenced by your overall diet. Ensure you're consuming a balanced diet rich in vitamins (especially Biotin, Vitamin E, and C), minerals (like zinc and iron), and protein.
By dedicating time to this post-removal care, you'll ensure your natural nails remain strong, healthy, and ready for whatever manicure you choose next. A simple guide to removing acrylics without destroying your nails always emphasizes this crucial aftercare.
Debunking Myths and Ensuring Safe Practices
When it comes to false nail removal, there are several misconceptions that can lead to significant nail damage. Let's debunk some common myths and reinforce safe practices to ensure your natural nails remain healthy when you learn how to take false nails off with acetone.
- Myth 1: You can just pick or peel them off. This is perhaps the most damaging myth. Forcibly picking, peeling, or prying off false nails will rip off layers of your natural nail plate, leading to extreme thinning, brittleness, pain, and even permanent damage. This is why patience and proper soaking are non-negotiable.
- Myth 2: Any solvent will work. While some household solvents might appear to dissolve nail products, they are not formulated for skin contact and can be extremely harsh, toxic, or even cause chemical burns. Only use 100% pure acetone specifically designed for nail removal.
- Myth 3: The longer you soak, the faster they come off. While sufficient soaking time is crucial, excessively long soaks can over-dry your skin and nails. It's better to do multiple shorter soaks if needed, rather than one prolonged soak that exposes your skin to acetone for too long.
- Myth 4: Your natural nails are ruined forever after false nails. This is often a result of improper removal, not the false nails themselves. With proper application, safe removal (especially knowing how to take false nails off with acetone correctly), and diligent aftercare, your natural nails can remain perfectly healthy.
To ensure safe practices, always work in a well-ventilated area to minimize fume inhalation. Keep acetone away from open flames, as it is highly flammable. Protect your eyes and avoid ingestion. If you have any open cuts or wounds around your nails, it's best to wait until they heal or seek professional help to avoid irritation or infection. Remember, removing fake nails at home safely and effectively requires patience and the right techniques to avoid damaging your natural nails. Your nail health should always be the top priority.