Have you ever looked at a cute bunny and wished you could sketch it yourself? Maybe you want to make a special card, or just enjoy the quiet joy of creating something sweet. Drawing a bunny, you know, is a really rewarding activity that many people find relaxing and fun. It's something that kids of all ages can have a great time learning, bringing a cute bunny to life with their own creativity.
This post is here to show you exactly how to draw bunny figures, starting from the very first lines. We will go through each step, making it simple and clear. You will learn how to draw a cute bunny from scratch using basic shapes, and by the end, you will be surprised at how easy it actually is to make something lovely.
So, get your drawing tools ready. Grab a pencil, maybe some paper, and let’s get started! This step-by-step tutorial is here to guide your hand and help you discover your own drawing abilities, too it's almost like magic.
Table of Contents
- Getting Ready to Draw Your Bunny
- The Basic Shapes: Building Your Bunny
- Bringing Your Bunny to Life: Features and Details
- Refining Your Bunny: Outlines and Erasures
- Adding Personality: Coloring and Shading
- Exploring Digital Drawing Tools
- Tips for Aspiring Artists
- Frequently Asked Questions About Drawing Bunnies
- A Final Thought on Drawing Your Bunny
Getting Ready to Draw Your Bunny
Before you make your first mark, it helps to gather a few things. You don't need a lot of fancy supplies, just some basic items that are easy to find. This part is about setting yourself up for a pleasant drawing time, you know, making it simple.
What You'll Need
For a start, a simple pencil is perfect. A standard HB pencil works well, as it's not too dark and not too light. You'll also want some paper, any kind will do, really. A good eraser is also helpful, especially for those early guiding lines. Sometimes, a fine-tip pen can be nice for going over your final lines, too.
If you plan to add color, crayons, colored pencils, or markers are good choices. Just pick what you like to use and what you have on hand. There is no need to buy anything new just for this, unless you want to, of course.
Setting Up Your Space
Find a comfortable spot with good light. A desk or a table works well, somewhere you can spread out a bit. Make sure you have enough room for your paper and your drawing hand. A quiet place might help you focus, but some people like to listen to music while they draw, which is fine, too.
Having everything within reach means you won't have to stop once you get going. This simple preparation helps you stay in the flow of creating. It really makes a difference, that.
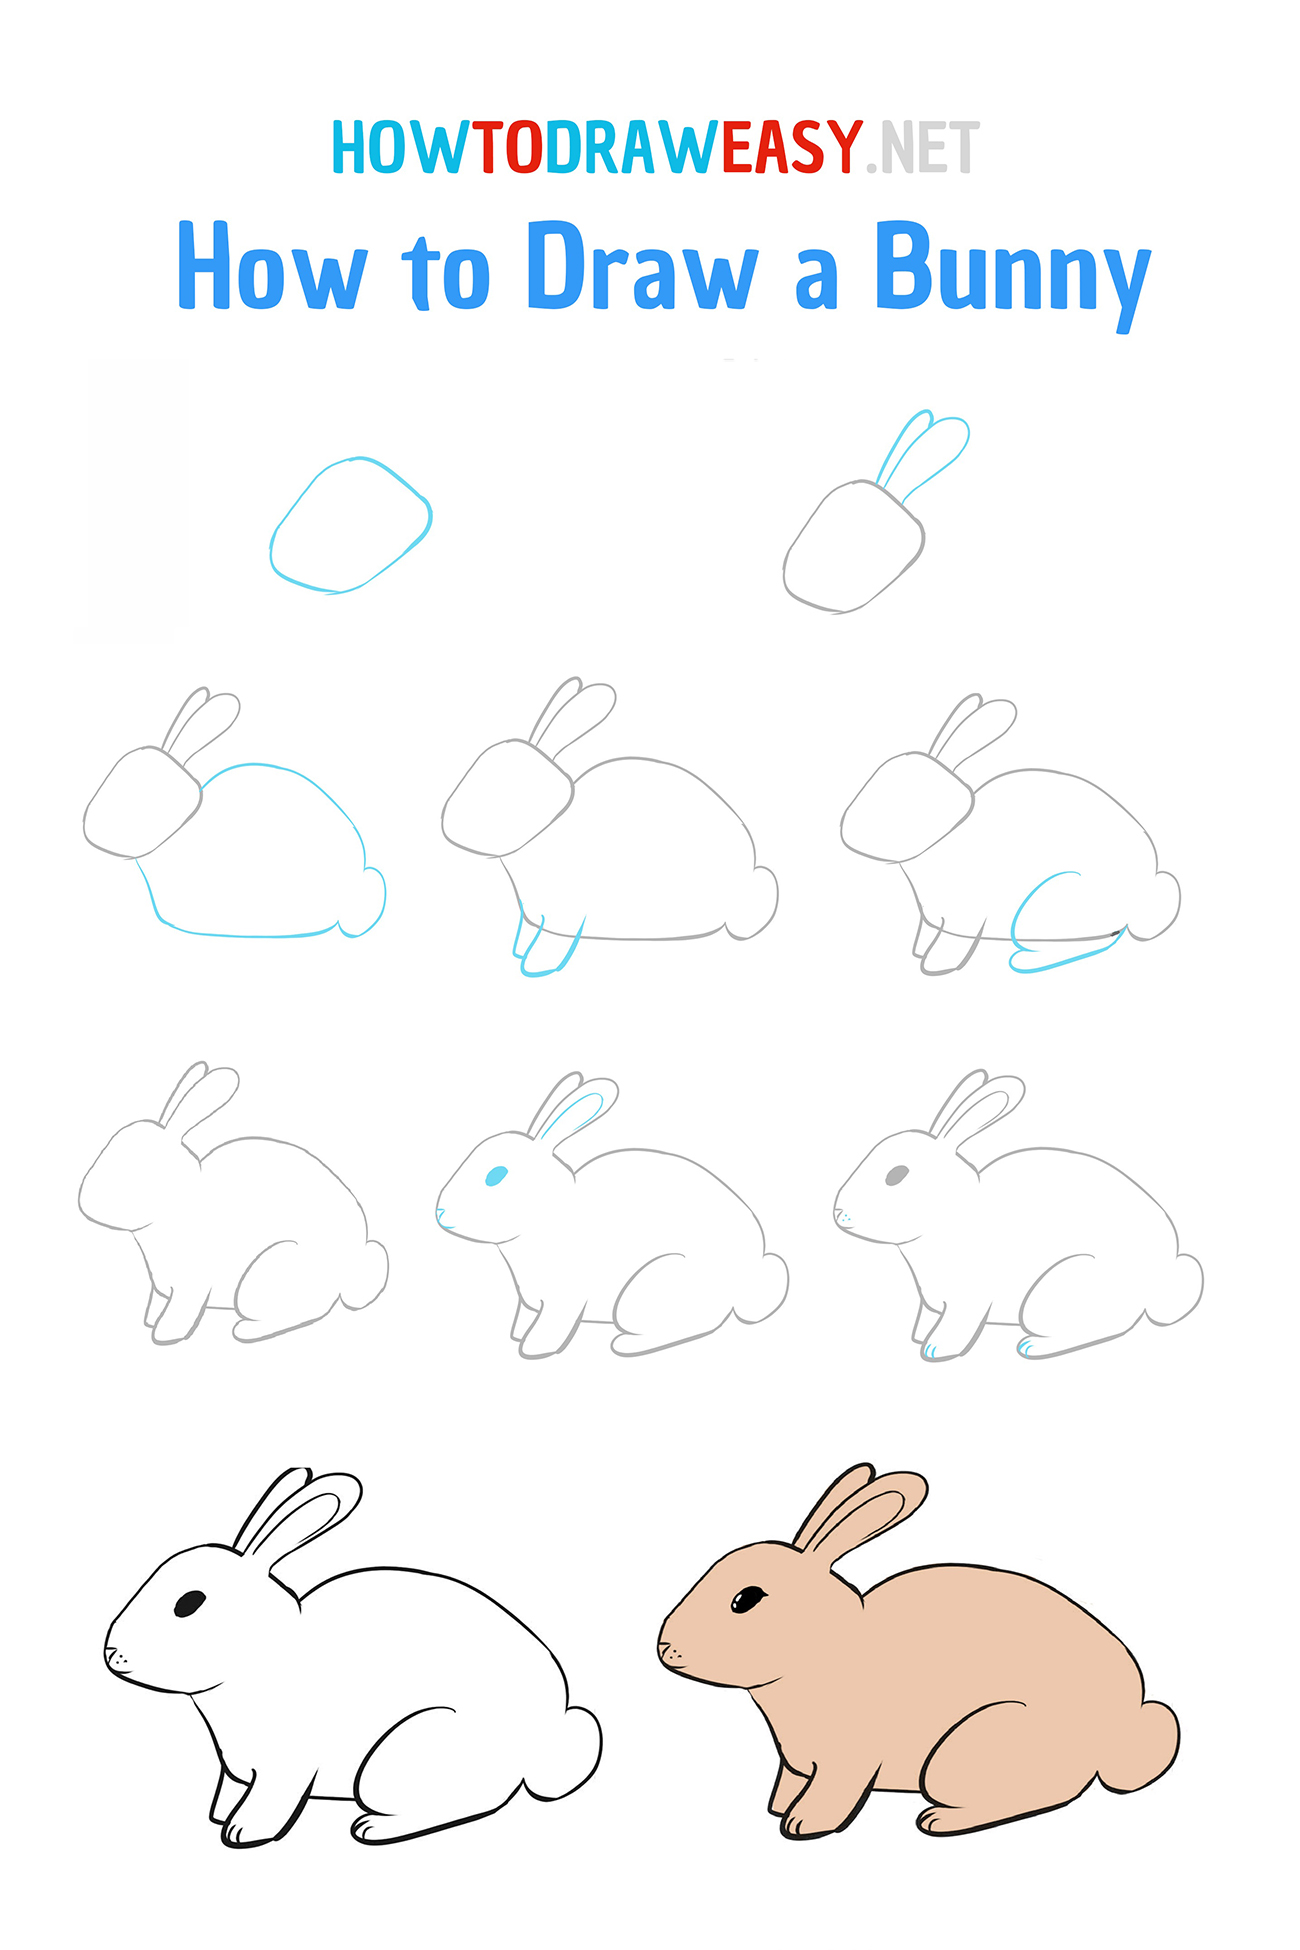
The Basic Shapes: Building Your Bunny
Learning how to draw bunny figures often starts with simple shapes. This is a common way to build up many drawings. It makes the whole process much less scary, honestly, and helps you get the proportions right from the start.
Starting with Circles
Begin by drawing two circles. One circle will be for the head, and another, slightly larger circle, will be for the body. Place the body circle below the head circle, making them touch just a little bit. These are just light guide circles, so don't press too hard with your pencil, as a matter of fact.
Think of these circles as the basic structure, the skeleton of your bunny. They don't have to be perfect, just roundish shapes. This approach helps you get the overall size and position down before you add details, you know, kind of like a blueprint.
Adding the Body
Next, add a big oblong shape on one side of the body circle. This oblong will become the lower part of your bunny's body, where its legs might attach. Connect it smoothly to the main body circle you drew earlier. This gives your bunny a bit more length and shape, which is pretty important.
This oblong shape helps to give the bunny a more natural, rounded form. It’s like adding a bit of volume to the initial simple circle. Remember, these are still just light lines, so you can easily change them if you need to, obviously.
Shaping the Head
Now, let's work on the head a little more. Draw a curved line on the side of the top circle to represent the cheek or jawline. This line helps to define the face shape, making it less like a simple ball. You can make it slightly round or a bit flatter, depending on the kind of bunny you want.
This small curve really starts to give your bunny character. It begins to turn that basic circle into something more recognizable as a head. You can adjust this curve to make your bunny look younger or older, or even a bit chubby, you know, if you like.
Bringing Your Bunny to Life: Features and Details
Once you have the basic shapes, it’s time to add the parts that make your drawing look like a bunny. This is where the fun really begins, as you see your creation come to life. These steps add personality and charm, basically.
Drawing the Ears
Bunnies are known for their long ears. Draw two long, oval shapes coming up from the top of the head circle. Make them slightly wider at the base and narrower at the tips. One ear might be standing straight up, while the other could be bent a little, perhaps.
Inside each ear, draw another, smaller oval shape to show the inner part of the ear. This adds depth and makes the ears look more realistic. These inner lines can be a bit lighter than the outer lines, too.
Creating the Face
For the face, start with two small circles for the eyes. Place them on the upper part of the head circle. You can add a smaller circle inside each eye for the pupil, and shade it in. A tiny white circle inside the pupil can make the eye look shiny, which is a nice touch.
For the nose, draw a small triangle or an upside-down 'Y' shape just below the eyes. From the bottom of the nose, draw two curved lines extending downwards and outwards for the mouth. This creates that classic bunny smile, you know, a sort of happy look.
Adding Paws and a Tail
Now, for the paws. Draw two small, rounded shapes at the bottom front of the body for the front paws. For the back legs, draw slightly larger, more curved shapes extending from the lower body oblong. Bunnies often have quite chunky back legs, which is sort of cute.
Finally, add a small, fluffy circle at the back for the tail. Bunny tails are usually round and puffy, like a little cotton ball. This really completes the bunny shape, giving it that familiar look, honestly.
Refining Your Bunny: Outlines and Erasures
After you have all the main parts sketched out, it’s time to clean up your drawing. This step makes your bunny look neat and finished. It helps your artwork really stand out, you know, kind of like putting on a final polish.
Making Lines Clean
Go over the lines you want to keep with a slightly firmer hand or a darker pencil. You are basically tracing your best guide lines. This makes the important parts of your bunny drawing stand out clearly. You can use a fine-tip pen here if you want a very crisp look, too.
Take your time with this step. Smooth out any wobbly lines and make sure the shapes flow well together. This is where your bunny really takes its final form. It's about making those chosen lines strong and clear, that.
Erasing Guidelines
Once your main lines are dark and clear, carefully erase all the light guide circles and oblongs you drew at the beginning. These were just there to help you, and now their job is done. A good quality eraser will remove them without smudging your new, darker lines, which is pretty handy.
Seeing those initial construction lines disappear reveals your finished bunny. It’s a satisfying moment, actually, when the drawing suddenly looks much more complete. This step truly transforms your sketch into a polished piece, you know, a bit like magic.
Adding Personality: Coloring and Shading
Adding color and a little bit of shading can bring even more life to your bunny drawing. This is where you can make your bunny unique. It's a chance to really express yourself, you know, and give your bunny a special feel.
Choosing Colors
Bunnies come in many colors: white, brown, grey, or even black. You can pick a realistic color or something fantastical, like a blue or purple bunny! Think about what kind of bunny you want to create. This is where your creativity really shines, basically.
If you are drawing an Easter bunny, you might want to add bright, cheerful colors. Or, if it's a wild bunny, earthy tones might be better. There are no strict rules here, just what feels right for your art, you know.
Simple Shading Tips
To add a bit of depth, think about where the light might be coming from. If the light is from the left, then the right side of your bunny would be a little darker. Use a slightly darker shade of your chosen color for these areas. This creates a sense of roundness, which is pretty cool.
You can also add a bit of pink to the inside of the ears and a blush to the cheeks for a cute effect. A little shadow under the bunny can make it look like it's sitting on a surface rather than floating. These small touches make a big difference, honestly, to the overall look.
Exploring Digital Drawing Tools
While paper and pencil are wonderful, many people also enjoy drawing on computers or tablets these days. Free online drawing applications are available for all ages, offering new ways to create. This can be a fun way to experiment, you know, with different methods.
Online Drawing Applications
There are many free online drawing applications out there. These tools let you create digital artwork to share online and export to popular image formats like JPEG, PNG, SVG, and PDF. They are quite handy for trying out new things without needing physical supplies, you know.
Some apps, like Sketchpad, are designed for all ages and offer a lot of features. You can easily draw, edit photos, or even craft images for social media posts, digital ads, paper, or apparel. It's pretty versatile, actually, what you can do.
Features to Look For
When picking an online drawing tool, look for features that make drawing easy. Things like a drag-and-drop feature for quick photo edits can be useful. Some tools even have shortcuts, like drawing the letter "s" to take you to a style chooser, which is quite clever.
Others let you access tool presets by holding a button and tapping the screen with different finger combinations. These little features can really speed up your drawing process. It's worth trying a few different ones to see what feels best for you, more or less.
Tips for Aspiring Artists
Learning how to draw bunny figures is just one step on a bigger creative path. You evolve, developing skills that turn blank spaces into expressive pictures. Keep drawing, and you will see how much you improve over time, you know, it's pretty amazing.
Practice Makes Progress
The more you