Have you ever seen a floor made entirely of pennies? It's a sight that really catches the eye. People often look at these unique surfaces and wonder how they come together. A penny floor, you see, is more than just loose change on the ground. It is a creative way to cover a surface with something that sparkles and shines.
This kind of flooring brings a truly distinct look to any room. It has a charm that feels both old and new. Imagine walking into a space and seeing thousands of copper coins arranged just so. It makes for a talking point, for sure. Plus, it is a project many people can take on themselves, which is pretty cool.
You might be thinking about giving your home a fresh look. Maybe you want something that stands out. A penny floor could be that very thing. It offers a chance to get creative with your living space. And, really, it shows a bit of personality in your design choices. So, let's explore this interesting idea.
Table of Contents
- What is a Penny Floor?
- Why Choose a Penny Floor?
- Planning Your Penny Floor Project
- Preparing Your Pennies
- Laying Out Your Design
- Installing Your Penny Floor: Step-by-Step
- Tips for a Smooth Installation
- Maintaining Your Copper Coin Surface
- Inspiration from Other Homeowners
- Frequently Asked Questions About Penny Floors
What is a Penny Floor?
A penny floor, basically, is a surface covered with many, many copper coins. People arrange these coins in patterns or just randomly. Then, they seal them with a clear coating, usually epoxy resin. This creates a smooth, hard surface that shows off the coins underneath. It is, you know, a very unique kind of tile work.
It is different from regular tiles. Penny tile is unique from other tiles in several ways. The small size of each coin means you work with many individual pieces. This allows for a lot of design freedom. You can make stripes, spirals, or even pictures. It really depends on how you want your space to look.
This kind of flooring has been around for a while, in a way. People have used coins in art and decor for ages. But, making a whole floor from them became popular more recently. It is a way to recycle money, so to speak, into something beautiful. And it adds a bit of history to your home, which is rather nice.
Why Choose a Penny Floor?
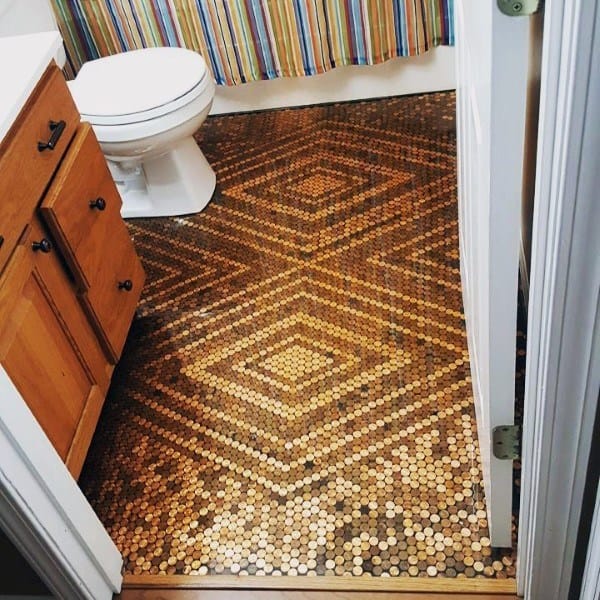
Choosing a penny floor offers several good reasons. For one, it looks truly amazing. A load of copper pennies, laid out in the most beautiful mosaic design, really draws the eye. It gives a room a very distinct feel. You get something that no one else has, basically.
Another big reason is the cost. With a load of copper pennies, some epoxy and just a little patience, you can create a stunning bespoke floor covering that really won’t cost you the earth. Compared to some fancy tiles, this can be a budget-friendly option. Especially if you collect pennies over time, you know.
Then there is the satisfaction of doing it yourself. Read on to find out what all goes into diying your own real penny floor. It is a big project, yes, but it is also very rewarding. You get to say, "I made this." That feels good, doesn't it? It is a creative outlet, too, for people who like to build things.
Planning Your Penny Floor Project
Before you even think about driving to the bank, you're going to have to do a little math. This is a big step. You need to know how many pennies you will need. Also, figure out how much epoxy and glue you will use. Planning helps avoid running out of things halfway through, which is pretty frustrating.
Think about the area you want to cover. Is it a small bathroom floor? Or a whole kitchen? The size of the space will tell you a lot. Consider the condition of your subfloor, too. It needs to be clean and flat. Any bumps will show through the pennies, and that is not ideal.
Also, think about the design you want. Do you want shiny pennies, or older, darker ones? Maybe a mix? This affects how you prepare them. Explore industrial and nostalgic copper coin flooring inspiration. There are many ways to make it look good. So, take your time deciding on the look.
Doing the Math for Your Pennies
Figuring out the number of pennies is important. A good rule of thumb is about 250-300 pennies per square foot. This varies a bit depending on how tightly you place them. So, you know, measure your space in square feet. Then multiply that number by around 275. That gives you a good estimate.
For example, a 10-foot by 10-foot room is 100 square feet. You would need about 27,500 pennies for that space. That is a lot of coins! This means many trips to the bank. Or, you could ask friends and family to save them for you. It is a fun way to get everyone involved, actually.
Remember to get more than you think you need. Some pennies might be too damaged. Some might get lost. Having extra is always better than not having enough. So, aim a little higher than your calculated number. It saves you trouble later on, really.
Gathering Your Materials
You will need more than just pennies. First, you need a strong adhesive to stick the pennies down. Construction adhesive or a good quality tile mastic works well. Then, you need a two-part epoxy resin for the top coat. This is what makes the floor smooth and shiny. You need a lot of it, too.
Other tools include a measuring tape, a level, and a straightedge. You will also need buckets for mixing epoxy. And brushes or rollers to apply it. Safety gear is also a must. Think gloves and eye protection. Epoxy can be messy and sticky, so protect yourself. That is pretty important.
You might also want some small spacers. These help keep the pennies evenly spaced. Some people just eyeball it, but spacers can make it look more uniform. So, think about what will help you get the best result. It makes the job easier, in a way.
Preparing Your Pennies
The look of your penny floor depends a lot on how you prepare the coins. You’ll need to find enough tarnished pennies and soak other. Some people like the mixed look of old and new. Others want all shiny, or all dark. This is where your design choice comes in. You can clean them or let them be.
To clean pennies, you can use a mix of vinegar and salt. Just soak them for a bit. Then rinse them really well. This brings out the bright copper color. If you want them to stay shiny, you might need to seal them before laying. Otherwise, they will naturally darken over time, which is also a nice look.
For a darker, aged look, you do not need to clean them much. Just make sure they are free of dirt and grime. A quick rinse and dry is usually enough. Some people even try to speed up the tarnishing process. But, mostly, time does that job for you. It is, you know, a natural process.
Laying Out Your Design
Before you glue anything down, it is a good idea to plan your pattern. Discover cool tiling projects with the best penny floor design ideas. You can draw it out on paper first. Or, lay out a small section of pennies on a piece of cardboard. This helps you see how it will look. It also lets you practice your arrangement.
Common patterns include rows, spirals, or even a herringbone style. Some people mix shiny and dark pennies to create contrasting patterns. You could even spell out words or make shapes. The possibilities are, like, pretty endless. It is your chance to be really creative.
Remember that the edges will be the trickiest part. You will likely need to cut some pennies to fit. This takes a special tool. So, plan for how you will handle those areas. It is good to think ahead about these details. This helps the whole project go more smoothly, you know.
Installing Your Penny Floor: Step-by-Step
Here is a guide on how to make a penny floor. This process takes time and patience. Do not rush it. Take breaks when you need them. The key is to work in small sections. This makes it feel less overwhelming, actually.
Prepare the Subfloor: Make sure your floor is clean, dry, and perfectly level. Any bumps or dust will cause problems. You might need to sand or patch areas. This step is very important for a good finish.
Apply Adhesive: Work in small areas, maybe 2x2 feet at a time. Spread a thin, even layer of your chosen adhesive. You do not want too much, or it will squeeze up between the pennies.
Lay the Pennies: Start from one corner and work your way across. Press each penny firmly into the adhesive. Keep your pattern consistent, if you have one. Use spacers if you want very even gaps. This is where the patience comes in, you know.
Fill in Gaps: Once the main area is done, go back and fill in any tiny spaces. You might need to use smaller pieces of pennies for edges or around obstacles. This takes a bit of precision. It is, like, a puzzle.
Let Adhesive Cure: Allow the adhesive to dry completely. This usually takes 24 to 48 hours. Do not walk on the pennies during this time. You want them firmly in place before the next step. So, just let it sit.
Clean the Surface: Once dry, clean the penny surface. Remove any adhesive residue or dirt. A damp cloth works well. Make sure the pennies are very clean before applying epoxy. This helps the epoxy stick better, you see.
Mix Epoxy Resin: Follow the manufacturer's instructions for mixing your two-part epoxy. Measure very carefully. Improper mixing can cause the epoxy not to cure properly. This is a critical step, honestly.
Pour and Spread Epoxy: Pour the mixed epoxy over a small section of the floor. Use a squeegee or roller to spread it evenly. You want a consistent thickness. Work quickly, as epoxy has a limited working time. It hardens pretty fast.
Remove Air Bubbles: Air bubbles will rise to the surface. You can remove them with a heat gun or a blow torch. Just wave the heat over the surface quickly. This makes the finish smooth and clear. It is a bit like magic, really.
Cure the Epoxy: Allow the epoxy to cure fully. This can take several days, depending on the product and humidity. Keep the area dust-free during this time. Once cured, your penny floor is ready to use! It is very satisfying to see the final result.
Tips for a Smooth Installation
If you’re planning on installing penny tile yourself, you’re going to find some things make it easier. Penny tile is unique from other tiles in several ways, so here are 12 tips for installing a penny tile floor. One big tip is to work in sections you can comfortably reach. Do not try to do too much at once. That just leads to mistakes, you know.
- Test a Small Area: Before you commit, try a small test patch. This helps you get a feel for the process. It also shows you how the pennies and epoxy will look.
- Use Good Ventilation: Epoxy fumes can be strong. Make sure your work area has plenty of fresh air. Open windows, or use fans.
- Have Plenty of Supplies: Run out of glue or epoxy mid-project is a pain. Double-check you have everything before starting.
- Keep Pennies Organized: If you are using different types of pennies (shiny vs. dark), keep them separate. This makes it easier to grab the right one.
- Clean as You Go: Wipe up any adhesive or epoxy spills right away. Once it dries, it is much harder to remove.
- Protect Surrounding Areas: Cover baseboards and walls with painter's tape and plastic sheeting. Epoxy is very sticky and hard to clean off other surfaces.
- Consider a Border: A simple border around the penny area can give it a finished look. This could be a strip of wood or metal.
- Be Patient with Curing: Do not rush the drying times for adhesive or epoxy. Letting them cure fully prevents problems later.
- Walk Softly: Once the epoxy is cured, it is durable. But, you know, avoid dragging heavy furniture right away. Give it a few extra days to harden fully.
- Think About Lighting: The way light hits your penny floor will change its look. Consider this when choosing your penny types.
- Get Help: This is a big project. Having a friend or family member help can make it much faster and more fun.
- Enjoy the Process: It is a creative endeavor. Try to enjoy the journey of making something truly special for your home.
Maintaining Your Copper Coin Surface
Once your penny floor is done, it is fairly easy to keep clean. The epoxy top coat protects the pennies. It makes the surface smooth and waterproof. You can sweep it just like any other hard floor. Then, mop it with a mild floor cleaner. That is pretty much it, honestly.
Avoid harsh chemicals or abrasive cleaners. These can dull or damage the epoxy. Also, try not to drop very heavy, sharp objects on it. While epoxy is tough, it can scratch or chip if hit hard enough. So, just be mindful, you know.
Over many years, the epoxy might show some wear. You can usually re-coat it if needed. This brings back the shine and protects the pennies again. It is a long-lasting surface, in a way. And it keeps its unique look for a very long time.
Inspiration from Other Homeowners
If you’re thinking about making your own penny floor, here are some projects by home owners just like you who have created beautiful works of art with penny flooring. People have put penny floors in kitchens, bathrooms, and even entryways. Some have done whole rooms, others just small sections, like a backsplash or a tabletop. It is really cool to see what others have done.
Check out this increadible diy penny floor that someone made in their home. Some folks arrange their pennies by date, or by mint mark. Others sort them by color, from shiny new ones to dark, aged ones. This creates a gradient effect that looks amazing. The possibilities are truly varied, you know.
You can find many pictures online of different penny floor designs. This can give you ideas for your own project. See what patterns you like. Think about how different lighting affects the look of the copper. It is a good way to get your creative juices flowing. You might discover a design you never thought of. Learn more about unique home flooring options on our site.
Frequently Asked Questions About Penny Floors
Our technical team receive several calls a lot about penny floors. People have many questions before starting this kind of project. Here are some common ones that come up, you know, quite often.
How many pennies do I need for a square foot?
You typically need about 250 to 300 pennies for one square foot. This number can change a little based on how much space you leave between each coin. So, it is good to have a few extra on hand, just in case.
Is a penny floor waterproof?
Yes, once sealed with epoxy resin, a penny floor is very much waterproof. The epoxy forms a solid, non-porous layer over the coins. This makes it a good choice for places like bathrooms or kitchens, where water might be an issue. It really seals everything in.
How long does it take to make a penny floor?
The time it takes varies a lot. It depends on the size of the area and how much detail you put into the design. For a small bathroom, it might take a few days of actual work, plus drying times. A larger room could take weeks. It is a project that requires patience and several steps. So, plan accordingly, you know.
For more insights on creative home projects, you can find more information here. You can also link to this page for more DIY home ideas.