Learning how to draw a fire can feel like a real artistic achievement, you know, because flames have this amazing, almost living quality to them. It's a skill that truly lights up your artwork, whether you're creating a cozy campfire scene, a dramatic dragon's breath, or just a cool abstract design. People often look at fire and feel a certain warmth or excitement, and capturing that feeling on a canvas, even a digital one, is quite rewarding.
There's a good reason why so many artists, just like you, want to figure out how to put convincing flames into their pictures. Fire is incredibly dynamic, always moving and changing shape, which can make it a bit tricky to get right. But with some helpful guidance and the right tools, it's actually more approachable than you might think. We'll explore the simple steps to make your fiery creations pop, so you can add that special spark to any piece.
And speaking of tools, you'll find that a free online drawing application, the kind that works for all ages, can be a fantastic companion on this artistic adventure. It's almost like having a whole art studio right there on your computer, ready for you to create digital artwork and share it online, or export it to popular image formats like jpeg, png, and svg. It's really pretty convenient for anyone looking to draw, edit photos, or design something new, so we'll talk a bit about how to use such a tool for your fire drawing endeavors.
Table of Contents
- Why Drawing Fire is a Hot Skill
- Getting Started with Your Digital Canvas
- The Basic Anatomy of a Flame
- Bringing Fire to Life with Color
- Creating Movement and Spark
- Common Questions About Drawing Fire
- Taking Your Fire Art Further
Why Drawing Fire is a Hot Skill
The Allure of Flames
There's something quite captivating about fire, wouldn't you agree? From ancient times, people have been drawn to its warmth and light, and that fascination continues today. When you learn how to draw a fire, you're tapping into a universal symbol of energy, passion, and transformation. It’s a powerful visual element that can add so much character to a drawing, whether it’s a tiny candle flicker or a massive blaze. Really, it just adds a lot of life.
For artists, the way light plays on flames, and how they seem to dance, offers a wonderful challenge and a chance to explore color and motion. It's an opportunity to really make your artwork feel alive. Plus, the ability to draw fire well can open up many creative possibilities for your projects, so it's a useful skill to pick up, naturally.
Digital Art and Fire
In the digital art space, fire drawing is, well, pretty popular. Many artists use it for illustrations, character designs, or even environmental art in games. Digital tools make it easier to experiment with colors and blending modes, which are very helpful for getting that glowing, translucent look that fire has. You can try out different effects without worrying about wasting materials, which is a big plus, obviously.
A free online drawing application, like the one we're talking about, is just perfect for this kind of experimentation. It lets you create digital artwork with ease, and you can quickly make adjustments to your flames until they look just right. You might even find it helps you craft images for social media posts, digital ads, paper, or even apparel, since fire can be a striking design element, you know.
Getting Started with Your Digital Canvas
Picking the Right Tools
When you're ready to begin drawing fire, choosing the right digital application is a good first step. A free online drawing application for all ages gives you a lot of flexibility. You can create digital artwork to share online and export to popular image formats like jpeg, png, svg, and pdf. This means your fiery creations can go just about anywhere, which is quite handy.
Such an application often lets you easily draw, edit photos, or design your next business card, so it’s a versatile tool. For drawing fire, you'll want brushes that can blend colors smoothly and perhaps some that have a soft, airy quality for smoke. The ability to make a quick photo edit with the drag and drop feature, or something similar, can also be useful if you're incorporating fire into an existing image. It's really rather simple to get going.
Setting Up Your Workspace
Before you even put down your first digital stroke, it helps to set up your drawing area. In a digital app, this means choosing a new canvas size and maybe a background color that will make your fire stand out. A dark background, for instance, often makes the bright yellows and oranges of fire truly glow. You can, of course, always change this later, so don't feel too stuck on your first choice.
You might want to think about the kind of fire you're drawing too. Is it a small, contained flame, or a large, wild blaze? This helps you pick the right canvas size and gives you a general idea of how much space your fire will take up. It's just a way to prepare yourself, you know.
The Basic Anatomy of a Flame
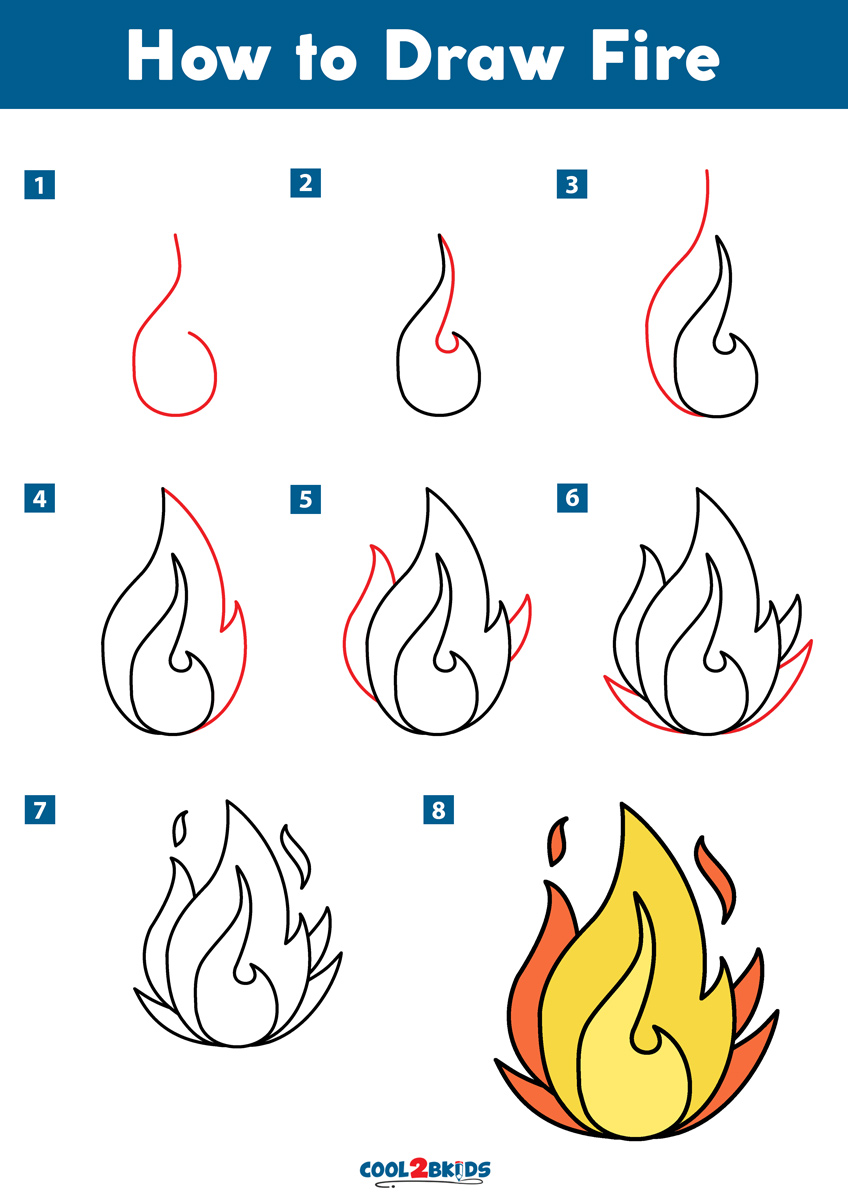
Understanding Fire Shapes
Fire, at its heart, is a collection of flowing, somewhat teardrop-like shapes that constantly change. When you're learning how to draw a fire, start by sketching very basic, tall, wavy shapes. Think of them as individual tongues of flame. These initial shapes don't need to be perfect; they're just guides for where your fire will be. Sometimes, it helps to imagine a soft, irregular cone or pyramid shape for the overall fire body, with smaller, wispier shapes breaking off the top, you know.
As you get more comfortable, you'll notice that flames aren't static. They twist and turn, reaching upwards. Practice drawing these basic shapes in different sizes and directions. You can even draw the letter "s" to take a shortcut to the style chooser in some applications, which might help you quickly pick a brush that gives you the right kind of flowing line for your initial sketches, so that's a neat trick.
The Core Glow
Every flame has a very bright, almost white or pale yellow core. This is where the fire is hottest and most intense. When you're drawing, this core is usually the lightest part of your flame. You'll want to use a very bright color for this area, making sure it stands out against the warmer colors around it. It's really what gives fire its luminous quality, more or less.
Think of it as the heart of your fire. As you move away from this core, the colors will gradually become darker and warmer. This transition is important for making your fire look real and vibrant. You can use a soft brush to blend these colors together, creating a smooth, glowing effect, which is rather nice.
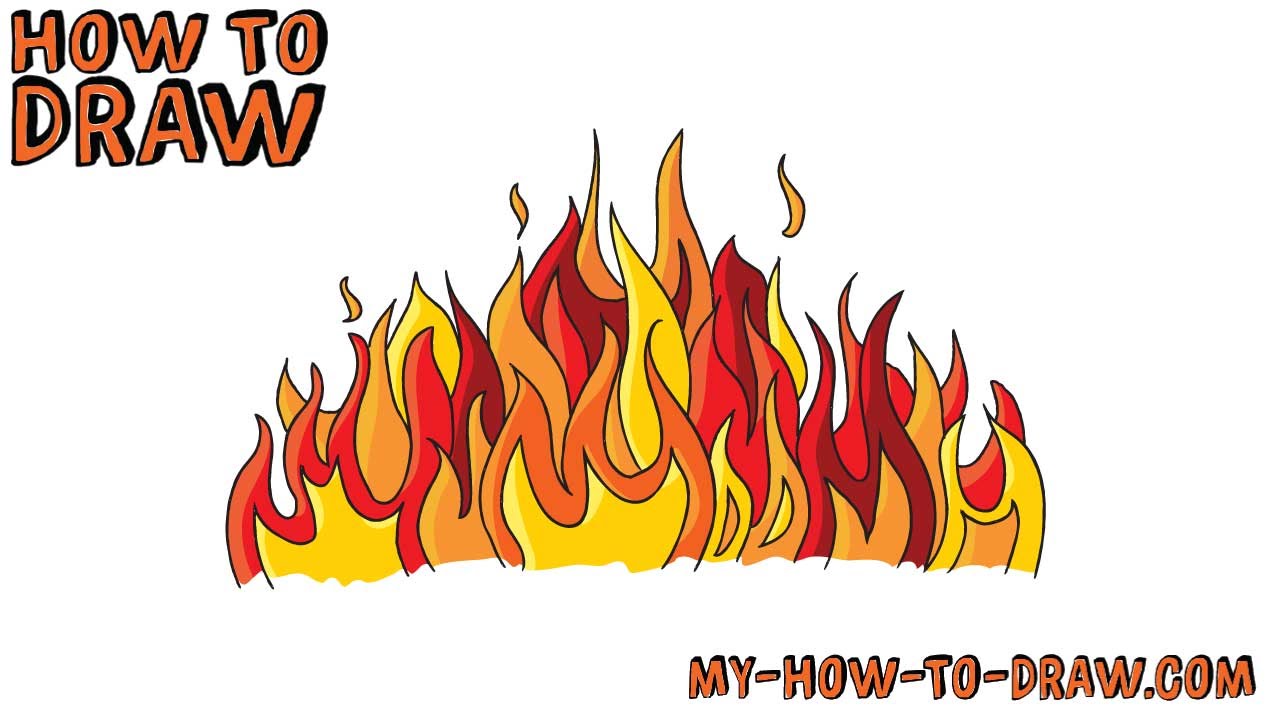
Flickering Tips
To make your fire look alive, you need to suggest movement and flicker. Flames are rarely still; they dance and sway. To show this, avoid drawing perfectly symmetrical shapes. Instead, make your flame edges a little uneven and jagged. Add smaller, wispy bits of flame breaking off the main body, as if they're reaching upwards or being carried by a breeze. This helps a lot, actually.
You can also use varying opacities in your digital drawing application. Some parts of the flame might be more transparent than others, giving that airy, almost ethereal look. This is where tool presets can be very helpful; while holding a button, you might tap the screen with different finger combinations to access tool presets that have been set up in the tool, allowing you to quickly switch between opaque and translucent brushes for a realistic flicker, so that's a pretty neat feature.
Bringing Fire to Life with Color
Choosing Your Palette
The colors you pick are very important for drawing fire. While we often think of fire as red, orange, and yellow, a truly convincing flame also uses hints of white, very pale yellow, and even some deep reds or purples at its edges, especially where it meets smoke. The brightest part of the flame is usually the lightest color, often a very pale yellow or white, you know.
As you move outwards from the core, you'll use brighter yellows, then oranges, and finally reds. For the very tips and edges, where the fire cools or interacts with air, you might even see a touch of dark red or brown. Experimenting with different shades within this warm spectrum is key. A good color picker in your online drawing application will be your best friend here, honestly.
Layering for Depth
Digital drawing makes layering colors for fire quite simple. Start with your darkest red or orange as a base, shaping the overall form of your flame. Then, on a new layer, add the brighter oranges, making them slightly smaller and placing them inside the red areas. Continue this process with yellows, and finally, the brightest whites or pale yellows for the core. This layering creates a wonderful sense of depth and glow, you see.
Blending modes in your software can also do wonders. "Add" or "Screen" blending modes, for instance, can make your colors glow even more intensely when layered over each other. This is where those tool presets we mentioned earlier really shine; you can set up quick access to different blending brushes or opacities, making the layering process much smoother and faster. It's a very effective way to work, really.
Adding Light and Shadow
Fire doesn't just glow; it casts light on its surroundings. This is a crucial detail for making your fire look like it belongs in the scene. Think about what your fire is illuminating. Is it a log, a character, or a wall? Add warm, orange-yellow light to those nearby objects, especially on the surfaces facing the flame. This light should diminish as it moves away from the fire, so it's not uniformly bright, you know.
Conversely, the areas behind the fire or those not directly hit by its light will be in shadow. These shadows will be darker, but they might still have a subtle warm tint from the ambient glow. This interplay of light and shadow is what truly makes your fire feel like a source of illumination in your drawing. For more on light and shadow, you might want to look into general art principles online, just for instance.
Creating Movement and Spark
The Dance of Flames
To capture the lively motion of fire, consider the direction of the "wind" or air currents in your scene. Flames usually rise, but they can be pushed and pulled by air. Make your flame shapes slightly asymmetrical and give them a gentle curve. Some parts might reach higher, while others might waver or bend. This irregularity makes them look much more natural, you know.
Use long, flowing brush strokes for the main body of the flame, and shorter, quicker strokes for the flickering edges. Think about how a real flame moves and try to imitate that fluidity with your digital brush. It's about giving the impression of constant change, which is pretty cool.
Adding Embers and Smoke
No fire is complete without a bit of smoke and some flying embers. For embers, use tiny dots of bright orange or red, often with a slight glow around them, especially near the base of the fire or rising upwards. These add a wonderful sense of detail and realism. You can use a very small, bright brush for these, just to make them pop.
Smoke, on the other hand, is usually a softer, more translucent element. It tends to be grey or brownish-grey, and it often curls upwards and disperses. Use a very soft, low-opacity brush for smoke, building it up in layers to create that wispy, airy look. The color of the smoke can also pick up some of the fire's warmth, especially close to the flames, so it's not just plain grey, you know. This detail really helps finish the picture.
Common Questions About Drawing Fire
Here are a few common questions people often ask when they're learning how to draw a fire:
How do I make my fire look realistic?
To make your fire look realistic, you really need to pay attention to the colors and how they blend. Use a range from bright white/yellow in the core to oranges and reds on the outside. Also, make sure your flame shapes are irregular and show movement, not perfectly smooth or static. Adding subtle light effects on nearby objects also helps it feel real, you know.
What are the best colors to use for fire?
The best colors for fire typically include very pale yellow or white for the hottest, brightest parts, moving out to bright yellows, oranges, and then reds. For the cooler edges or where smoke meets flame, you might even use hints of dark red, brown, or even a touch of purple. It's about creating a smooth transition across these warm shades, honestly.
How do I draw fire on a digital platform?
Drawing fire digitally is quite simple with the right approach. Start with basic flame shapes, then layer your colors from dark to light, using blending modes to enhance the glow. Utilize soft brushes for blending and creating smoke, and small, bright brushes for embers. A free online drawing application is a great place to experiment with these techniques, as you can easily undo and try new things, so that's a good way to learn. Learn more about digital art tools on our site.
Taking Your Fire Art Further
Practice Makes Perfect
Like any skill, drawing fire gets easier and better with practice. Don't be afraid to experiment with different brush types, color combinations, and flame shapes. Try drawing fire in various situations – a candle flame, a roaring bonfire, a dragon's breath, or even a magical spell. Each scenario presents its own unique challenges and learning opportunities, you know.
Remember, your free online drawing application is there for endless experimentation. You can just keep trying new things without any cost. Look at real-life fire, or reference images, to get a better feel for how it behaves. The more you observe and practice, the more natural and convincing your drawn flames will become, which is pretty cool.
Sharing Your Fiery Creations
Once you've created some fiery masterpieces, you'll probably want to show them off! A good online drawing application lets you create digital artwork to share online very easily. You can export your art to popular image formats like jpeg, png, svg, and pdf, which means your work is ready for social media, portfolios, or even printing.
Sharing your art is a great way to get feedback and connect with other artists. It's also a chance to inspire others with your amazing flame drawings. So, go ahead and put your work out there. We hope this guide has given you a solid start on how to draw a fire and helped you feel more comfortable with your digital tools. You can also link to this page for more drawing tips.
Just recently, as of late 2023, the interest in dynamic visual effects like fire in digital art continues to grow, especially with more people exploring creative outlets online. The accessibility of free online tools means anyone can jump in and start making amazing things. So, really, there's no better time to pick up your digital pen and start creating some truly spectacular flames. You've got this, honestly.