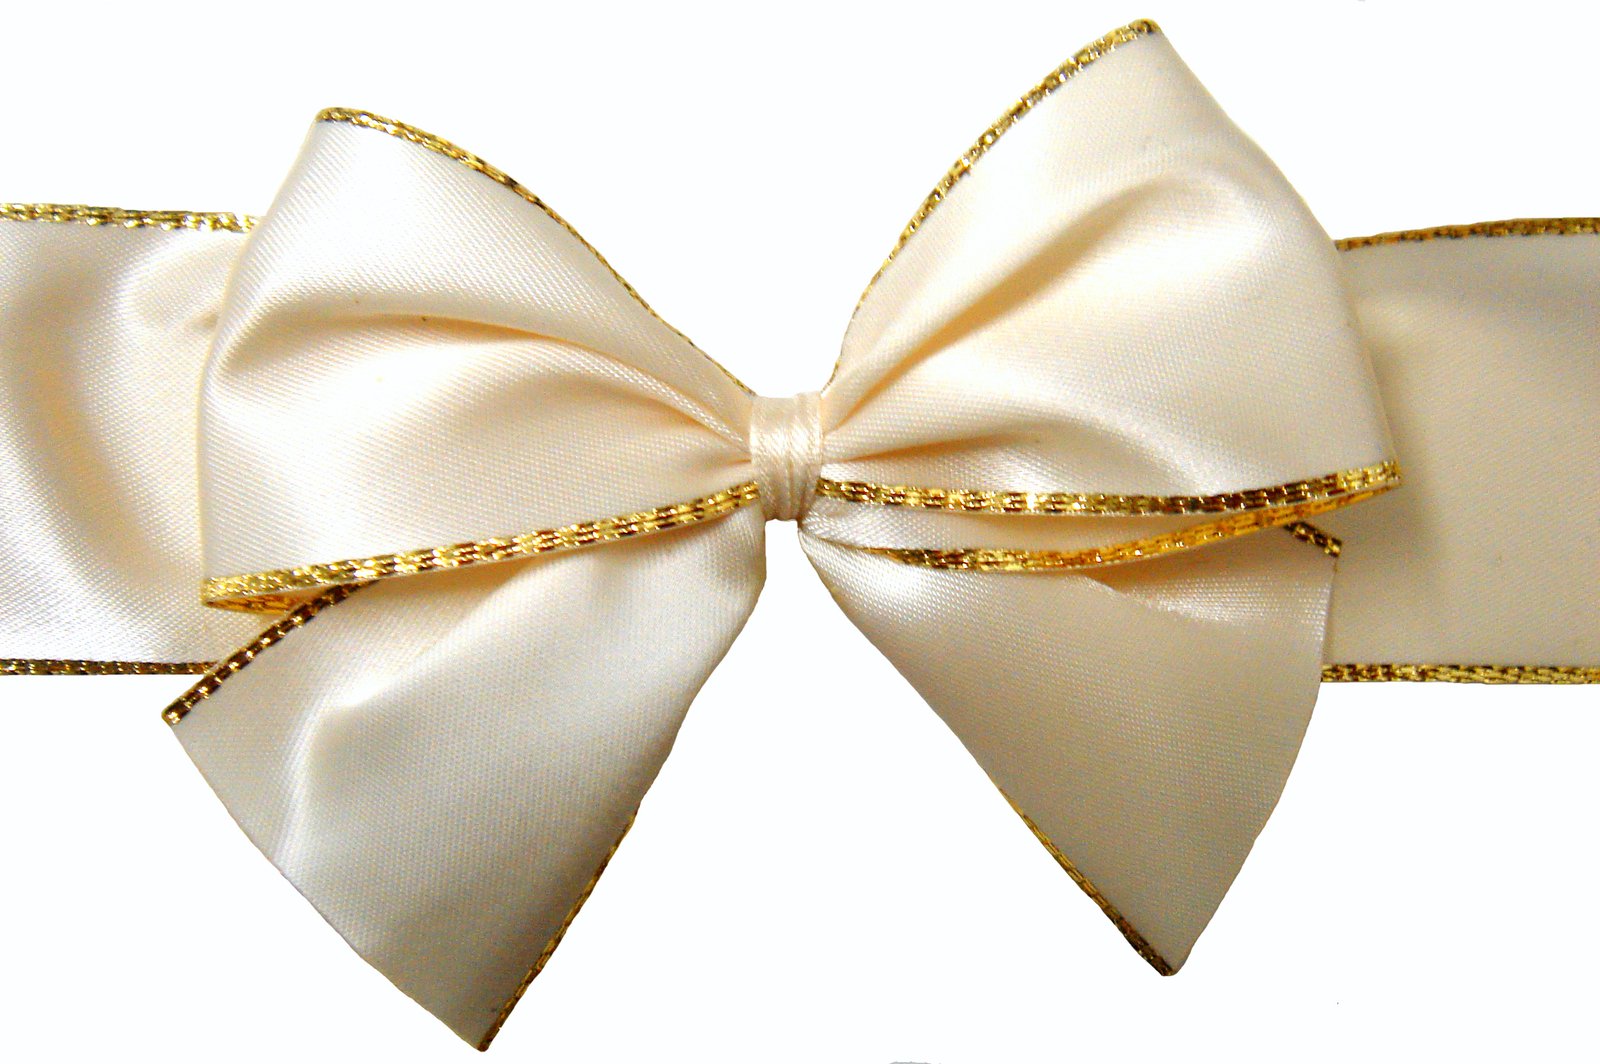
There's a special kind of joy that comes from giving a beautifully wrapped gift, isn't there? It's almost like the wrapping itself is part of the present, setting the stage for what's inside. And when you add a perfectly crafted bow made from wrapping paper, it just takes things to a whole new level. That bit of extra effort really shows you care, and it can make even a simple item feel truly special.
Thinking about how to make a gift stand out, you know, it's a bit like choosing the right gear for a big task. Just as someone might consider their "bow selection" for a specific kind of challenge, picking the right "bow wrapping paper" can really change the outcome of your gift presentation. It’s about getting that look that just feels right, that creates an instant impression.
So, if you're looking to elevate your gift-giving game, or just want to add a touch of handmade charm, creating your own bows from wrapping paper is a fantastic skill to pick up. It's surprisingly simple once you get the hang of it, and it gives you endless creative possibilities. Plus, it's a way to use up those leftover paper scraps, which is pretty neat, too.
Table of Contents
- The Magic of Bow Wrapping Paper
- Why Make Your Own Bows?
- Choosing the Right Paper for Your Bows
- Crafting Your Paper Bows: Step-by-Step
- Creative Ideas for Using Paper Bows
- Troubleshooting Common Bow-Making Issues
- Conclusion: Wrap It Up Beautifully
- Frequently Asked Questions
The Magic of Bow Wrapping Paper
You know, there's something truly special about a gift that's not just wrapped, but adorned with a beautiful bow made right from the same paper. It’s a little detail, but it makes a big difference. It shows a level of thoughtfulness, a personal touch that store-bought bows just can't quite match. It’s about creating a cohesive look, making the whole package feel like a work of art, which is pretty cool.
This isn't just about saving a few pennies, either. It's about customisation. You can match the bow perfectly to the paper, or even create contrasting effects that really stand out. It’s like, when you're thinking about a "bow/crossbow setup" for a specific purpose, you're looking for that ideal combination that performs best. Similarly, pairing the right paper with the right bow style can give your gift that perfect "raw damage" in terms of visual impact, making it truly memorable.
And it's quite satisfying, actually, to know you made that elegant flourish yourself. It adds a layer of personal connection to the gift, making it more than just an item; it becomes an experience. That's a pretty nice feeling, you know, to know you put that extra bit of care into it.
Why Make Your Own Bows?
Making your own bows from wrapping paper offers a bunch of great benefits. First off, it's a fantastic way to recycle and use up those odd bits of paper that might otherwise just get tossed. You know, those pieces that are too small for a whole gift but too big to just ignore? This gives them a whole new purpose, which is pretty smart.
Then there's the cost factor. Store-bought bows, especially the really fancy ones, can add up, particularly if you have a lot of gifts to wrap. Crafting your own means you're only paying for the paper, and often, you're using paper you already have. It's a very budget-friendly approach, which is something many people appreciate, you know?
But beyond the practical stuff, there's the creative freedom. You're not limited to what's on the shelf. You can choose any pattern, any color, any texture of paper. This means your bows can be as unique as the person you're giving the gift to. It's a bit like having an "endless quiver" of design options, always having the right "arrow" for the job, so to speak. You can truly make each gift feel one-of-a-kind.
Choosing the Right Paper for Your Bows
Picking the right paper is pretty important when you're making bows. It's not just about how it looks, but also how it handles. Some papers are just better suited for folding and holding their shape, which is a key part of a good bow. It's like, you wouldn't use just any material for an actual bow; you need something with the right properties for strength and flexibility. The same goes for your "bow wrapping paper."
Paper Types and Their Impact
For making bows, you generally want a paper that's not too thick, but also not too flimsy. Thicker papers, like some heavy-duty craft papers, can be hard to fold sharply and might crack when creased. On the other hand, super thin papers, like tissue paper, might tear easily and won't hold their shape very well. You need that sweet spot, you know?
A good quality standard wrapping paper is often perfect. It has enough body to create crisp folds and loops, but it's still pliable enough to work with. Papers with a slight sheen or a matte finish can both work, depending on the look you're going for. Some folks find that paper with a little bit of texture adds a nice touch, too. It’s about finding that balance, really, that allows for precision, a bit like how a "seeker bow" offers good quality of life with its features.
Colors and Patterns that Pop
When it comes to colors and patterns, the sky's the limit, really. You can choose paper that matches your gift wrap exactly, creating a seamless, elegant look. Or, you could go for a contrasting color or pattern to make the bow really pop. Imagine a plain solid-colored gift with a vibrant, patterned bow; it makes a statement, you know?
For a subtle effect, you might pick a paper with a tone-on-tone pattern, where the design is there but not too loud. For something more playful, bold stripes, polka dots, or even whimsical illustrations can be fantastic. Just consider the overall feel of the gift and the occasion. A Christmas gift might have a festive red and green bow, while a birthday present for a friend might feature something bright and quirky. It's all about what feels right for the moment.
Crafting Your Paper Bows: Step-by-Step
Now for the fun part: actually making the bows! There are many ways to craft a bow from paper, but two popular styles are the classic loop bow and the layered star bow. Both are fairly straightforward once you get the hang of the technique. It’s about practice, really, much like mastering any skill. You know, it's not like "bow spamming" where you just fire away; it's about thoughtful, precise movements.
The Classic Loop Bow
This is probably the most common type of paper bow you see, and it's quite elegant. You'll need a strip of paper, some scissors, and a bit of adhesive like double-sided tape or a glue stick. It's a simple process, but the results are really nice.
First, cut your paper into several strips of varying lengths. For a medium-sized bow, you might start with strips that are about 1 inch wide. You'll need one very short strip for the center, a few medium-length ones for the inner loops, and a few longer ones for the outer loops. The exact lengths will depend on how big you want your bow to be, which is a bit like adjusting your "range" for a shot.
Next, take each strip and form a loop, bringing the ends to the middle and securing them with a tiny bit of tape. You'll make several of these loops. Then, you start layering them, arranging the longer loops at the bottom and gradually placing shorter ones on top, creating a rounded, full shape. It's about building it up, layer by layer, which is pretty satisfying.
Once you have all your loops arranged, secure them all together in the center. You can use a stapler, a strong glue dot, or even tie them with a thin string. Finally, take that very short strip you set aside and wrap it around the center, covering where all the loops meet, and secure it on the back. This gives it a clean, finished look. It's a bit like adding the "right enchants" to something; it just makes it better.
The Layered Star Bow
The layered star bow has a bit more flair and can look quite intricate, but it's still quite manageable. For this one, you'll typically cut several strips of paper, all the same length, and then shape them into figure-eights or infinity symbols. This is where "My text" actually comes in handy! Remember, "I tested a new infinity bow and shot 1538 shots before the bow broke"? This bow design has that same "infinity" shape as its base, which is pretty neat.
To start, cut about 8-10 strips of paper, each about 1 inch wide and 10-12 inches long. Take one strip and twist it into an "infinity" shape, crossing the ends in the middle to form two loops. Secure the center with a staple or a small piece of tape. You'll make several of these "infinity" pieces, which is kind of fun to do.
Once you have all your infinity pieces, stack them on top of each other, rotating each new layer slightly so the loops fill in the gaps of the layer below. This creates a full, star-like appearance. Secure all the layers together in the center. Again, a staple or strong glue dot works well here. It’s about careful placement, you know, making sure each piece contributes to the overall effect.
Finally, just like with the loop bow, take a small strip of paper and wrap it around the center to cover the fasteners and give it a polished finish. You can also curl the ends of some of the loops with scissors for an extra touch of elegance. This bow really stands out and gives your gift a very professional, thoughtful look, which is pretty great.
Creative Ideas for Using Paper Bows
Once you've mastered making these beautiful paper bows, you'll find so many ways to use them beyond just gift wrapping. They're incredibly versatile, actually, and can add a handmade touch to all sorts of things. It’s about seeing the potential, you know, much like seeing how "Apotheosis mods and gems with endless quiver enchant" can transform a gaming experience.
Consider using them as decorations for party favors. A small paper bow on each favor bag or box can tie your party theme together beautifully. They're also wonderful for embellishing homemade cards or scrapbooking pages. A little bow can add dimension and a pop of color to your paper crafts, making them feel more special, which is pretty cool.
You could even string several small bows together to create a unique garland for a festive occasion. Or, attach them to plain gift tags for an extra touch of charm. They're also great for sealing envelopes in a pretty way, or for decorating a simple jar of homemade treats. The possibilities are nearly endless, and it’s a fun way to get creative with paper, which is a very simple material, yet so adaptable.
Troubleshooting Common Bow-Making Issues
Even with the best intentions, you might run into a few little hiccups when making paper bows. Don't worry, that's totally normal. It's a bit like when you're learning something new, you know, there's always a learning curve. Just as you "can repair the bow before it breaks" in a game, you can usually fix little issues with your paper bows, too.
If your loops aren't holding their shape, it might be that your paper is too thin or your adhesive isn't strong enough. Try using a slightly heavier paper or switching to a stronger double-sided tape or glue dot. Sometimes, just pressing down firmly on the adhesive for a few extra seconds can make a big difference, too. It's about getting that good connection, that secure hold.
If your bow looks a bit flat or sparse, you probably need more loops or wider strips of paper. Experiment with adding an extra layer of loops, or make your strips a little wider to create more volume. You could also try curling the edges of your loops with a blunt knife or the edge of scissors to give them more dimension. It’s about adding that fullness, that visual impact, you know, so it doesn't look like "utter garbage" as some "bows in the game" might.
And if your cuts aren't perfectly straight, don't fret too much. Sometimes a slightly imperfect, handmade look adds to the charm. But if you want crisper lines, using a paper cutter instead of scissors can really help. Practice makes perfect, and you'll get better with each bow you make. It’s a bit like "honing arrows"; the more you do it, the more precise you become.
Conclusion: Wrap It Up Beautifully
So, you see, creating beautiful bows from "bow wrapping paper" is a truly rewarding skill that adds so much personal flair to your gifts. From picking the right paper to mastering those folds, each step helps transform a simple present into something truly memorable. It's about that personal touch, that extra bit of care that really makes a difference, which is pretty special.
Remember, practice makes perfect, and just like any craft, you'll get better with each bow you make. Don't be afraid to experiment with different papers, colors, and sizes. You might even find your own unique style. So go ahead, grab some paper, and start crafting those gorgeous bows. For more creative ideas, you can Learn more about gift presentation on our site, and find more crafting inspiration by visiting our DIY section.
Frequently Asked Questions
What kind of paper is best for making bows?
Generally, a good quality standard wrapping paper works best. It's pliable enough to fold easily but strong enough to hold its shape. Avoid papers that are too thick, as they can crack when creased, or too thin, as they might tear easily. You want something with a bit of body, but still flexible, which is a pretty good balance.
How do you make a bow out of wrapping paper?
You typically cut paper into strips, then form these strips into loops. You can make several loops and layer them to create a full, rounded bow, or twist them into figure-eight shapes for a star-like effect. Secure the loops in the center with tape or glue, then wrap a small strip of paper around the middle for a neat finish. It's a fairly straightforward process, honestly, once you get the hang of it.
Can you use any wrapping paper for bows?
While you can technically try with any wrapping paper, some types will give you better results than others. Papers that are too glossy might be hard to secure with adhesive, and very textured papers might not fold as cleanly. For the best outcome, pick a paper that's not too thick or too thin, and one that holds a crease well. It’s about finding that paper that just works well for folding, you know?