Mastering j in cursive is a journey that blends precision with artistic expression, offering a unique satisfaction as you watch fluid strokes transform into a graceful letter. Often considered a pivotal letter due to its distinct descender and elegant loops, the cursive 'j' is more than just a character; it's an exercise in control, rhythm, and flow, fundamental to developing beautiful handwriting. This comprehensive guide is designed to demystify the process, offering clear, actionable steps and insights to help you perfect both the lowercase and uppercase 'j' in your cursive script. Whether you're a beginner embarking on your cursive adventure or looking to refine your existing skills, you'll find valuable techniques, practical exercises, and essential resources to guide your hand.
From understanding the foundational strokes to connecting the 'j' seamlessly within words, we'll explore every facet of this captivating letter. We'll delve into the specific challenges it presents, how it differs from its print counterpart, and the numerous benefits that mastering it brings to your overall handwriting prowess. Prepare to transform your penmanship, one elegant curve at a time, and unlock the full potential of your cursive writing.
Table of Contents
- Why Master J in Cursive? Unveiling Its Unique Benefits
- Understanding D'Nealian Cursive: The Most Common Style in the US
- Essential Tools for Your Cursive Journey
- Mastering the Lowercase 'j' in Cursive: Step-by-Step Guide
- Crafting the Capital 'J' in Cursive: Grace and Style
- Common Mistakes and How to Overcome Them
- Practice Makes Perfect: Utilizing Resources for 'J'
- Expert Tips for Confident Handwriting
Why Master J in Cursive? Unveiling Its Unique Benefits
Learning cursive writing, in general, offers a wealth of cognitive and motor benefits. It enhances fine motor skills, improves hand-eye coordination, and can even stimulate different parts of the brain compared to print writing, fostering creativity and critical thinking. Beyond these universal advantages, mastering the letter j in cursive holds its own special significance. The cursive 'j' is unique because it helps you practice long descenders and smooth upward strokes, which are important for rhythm and flow in cursive. Unlike many other letters that stay within the baseline and midline, the 'j' dips below the line, requiring a controlled descent and an elegant return stroke. This specific movement trains your hand to maintain consistent pressure and fluidity, crucial elements for achieving beautiful, legible cursive. Furthermore, once you're comfortable with 'j', transitioning between it and other letters becomes much smoother, improving the overall coherence of your handwriting. You might wonder why the cursive 'j' is sometimes perceived as hard, or how it differs from the print 'j'. In print, the 'j' is typically a straight vertical line with a small hook and a separate dot. In cursive, however, it transforms into a continuous, flowing stroke, often starting with a gentle curve, extending downwards, looping back up, and then finishing with a dot. This continuous motion and the need for a precise loop and descender can be challenging initially, but mastering it brings significant benefits to your handwriting skills, instilling a sense of grace and consistency that transfers to other letters. It teaches you to integrate elegant loops and descenders into your script, adding a refined touch to your penmanship.Understanding D'Nealian Cursive: The Most Common Style in the US
When discussing how to write j in cursive, it's important to acknowledge the specific style often taught in schools. This page focuses on D'Nealian cursive, the most common style in the US. Developed by Donald Thurber, D'Nealian cursive was introduced in the late 1970s as a simplified approach to teaching handwriting, aiming to make the transition from print to cursive smoother for students. D'Nealian distinguishes itself from older, more ornate cursive styles by emphasizing a continuous stroke and a slight slant, which naturally encourages proper letter formation and connectivity. Letters in D'Nealian often have a small "tail" or "lead-in" stroke, preparing the hand for the next letter without lifting the pen unnecessarily. This focus on continuous flow minimizes breaks, making the writing process more efficient and the resulting script more fluid. For the 'j', this means a streamlined formation that prioritizes legibility and ease of writing over elaborate flourishes. Understanding D'Nealian principles will provide a solid foundation for mastering the cursive 'j' and developing a clear, consistent handwriting style.Essential Tools for Your Cursive Journey
Embarking on your journey to master j in cursive requires more than just enthusiasm; having the right tools can significantly impact your learning experience and the quality of your practice. Just as an artist needs the right brushes, a calligrapher needs the appropriate implements to bring their strokes to life. 1. **Quality Paper:** Opt for lined paper, preferably with a dotted midline. This provides crucial guidance for letter height and baseline alignment, especially for letters like 'j' that have descenders. Smooth paper surfaces are ideal as they allow your pen to glide effortlessly, preventing ink blots and ensuring clean lines. 2. **Comfortable Writing Utensil:** * **Pencils:** For beginners, pencils are excellent. They offer erasability, allowing you to correct mistakes without starting over, and provide tactile feedback that helps in controlling pressure. A good quality mechanical pencil or a well-sharpened wooden pencil (HB or 2B lead) works well. * **Pens:** As you gain confidence, experiment with different pens. Gel pens, rollerball pens, and even fountain pens (for the adventurous!) can provide a smooth, consistent ink flow that enhances the fluidity of cursive. Choose a pen that feels comfortable in your hand and allows for a relaxed grip, as tension can hinder your progress. 3. **Printable Worksheets:** These are invaluable resources. They offer guided tracing exercises, allowing you to follow pre-drawn lines to internalize the correct letter formation. Many worksheets also provide space for freehand practice, enabling you to apply what you've learned. You can download or print 10 worksheets to help students learn and practice writing cursive 'j' letters, including uppercase, lowercase, words, arrows, and more. K5 Learning offers free and inexpensive resources for kids in kindergarten to grade 5, which can be a great starting point. 4. **Video Tutorials:** Visual learning is incredibly effective for cursive. Watching someone demonstrate the strokes in real-time can clarify ambiguities that static images might leave. Look for free video tutorials that show the formation, lifting the pen, and connectivity tips for this letter. MyCursive.com, for instance, offers video tutorials and full resources for all cursive letters. 5. **Patience and Persistence:** While not a physical tool, these are perhaps the most crucial. Learning cursive takes time and consistent effort. Embrace the process, celebrate small victories, and don't get discouraged by initial imperfections. By equipping yourself with these essential tools, you're setting yourself up for a successful and enjoyable journey in mastering the elegant art of the cursive 'j'.Mastering the Lowercase 'j' in Cursive: Step-by-Step Guide
The lowercase j in cursive is a delightful letter to write once you understand its unique flow. It combines a descender, a loop, and a dot, requiring a graceful and controlled motion. Here's how to write the cursive letter 'j' with smooth curves and a long tail, broken down into simple steps:The Basic Structure and Initial Stroke
To begin writing the letter ‘j’ in cursive, you start at the top of the line, just like most cursive letters. Think of it in 4 easy steps to master both lowercase and capital cursive 'j' with practical writing exercises. 1. **Start with a Small Downward Curve:** Begin from the top line (or just below it, depending on your specific style guide) and make a small downward curve, going down to the left. This initial curve should be gentle and set the stage for the rest of the letter. 2. **Extend Downwards with a Descender:** From the bottom of that curve, gently continue your stroke straight down, extending below the baseline. This is your descender, which should be a consistent length. 3. **Form the Loop:** As you reach the desired depth below the baseline, curve your stroke to the left, then loop it upwards and to the right, crossing over your initial downward stroke. The loop should be elegant and not too wide, ensuring the letter remains compact and legible. 4. **Finish and Dot:** After crossing your initial stroke, continue upwards slightly to prepare for connection to the next letter. Lift your pen. Finally, go back and place a small dot directly above the 'j', just like you would with a print 'j'. This dot is crucial for identification.The Dot and Connectivity
The dot for the lowercase 'j' should be placed after you have completed the main body of the letter. It’s a distinct, small mark, not a large circle. For connectivity, the small upward stroke at the end of the loop is designed to seamlessly join with the next letter in a word. This final upward stroke ensures rhythm and flow in cursive writing. Practice writing the letter 'j' in upper and lower case with these printable cursive worksheets. See the formation, lifting the pen, and connectivity tips for this letter to ensure neat, confident handwriting.Crafting the Capital 'J' in Cursive: Grace and Style
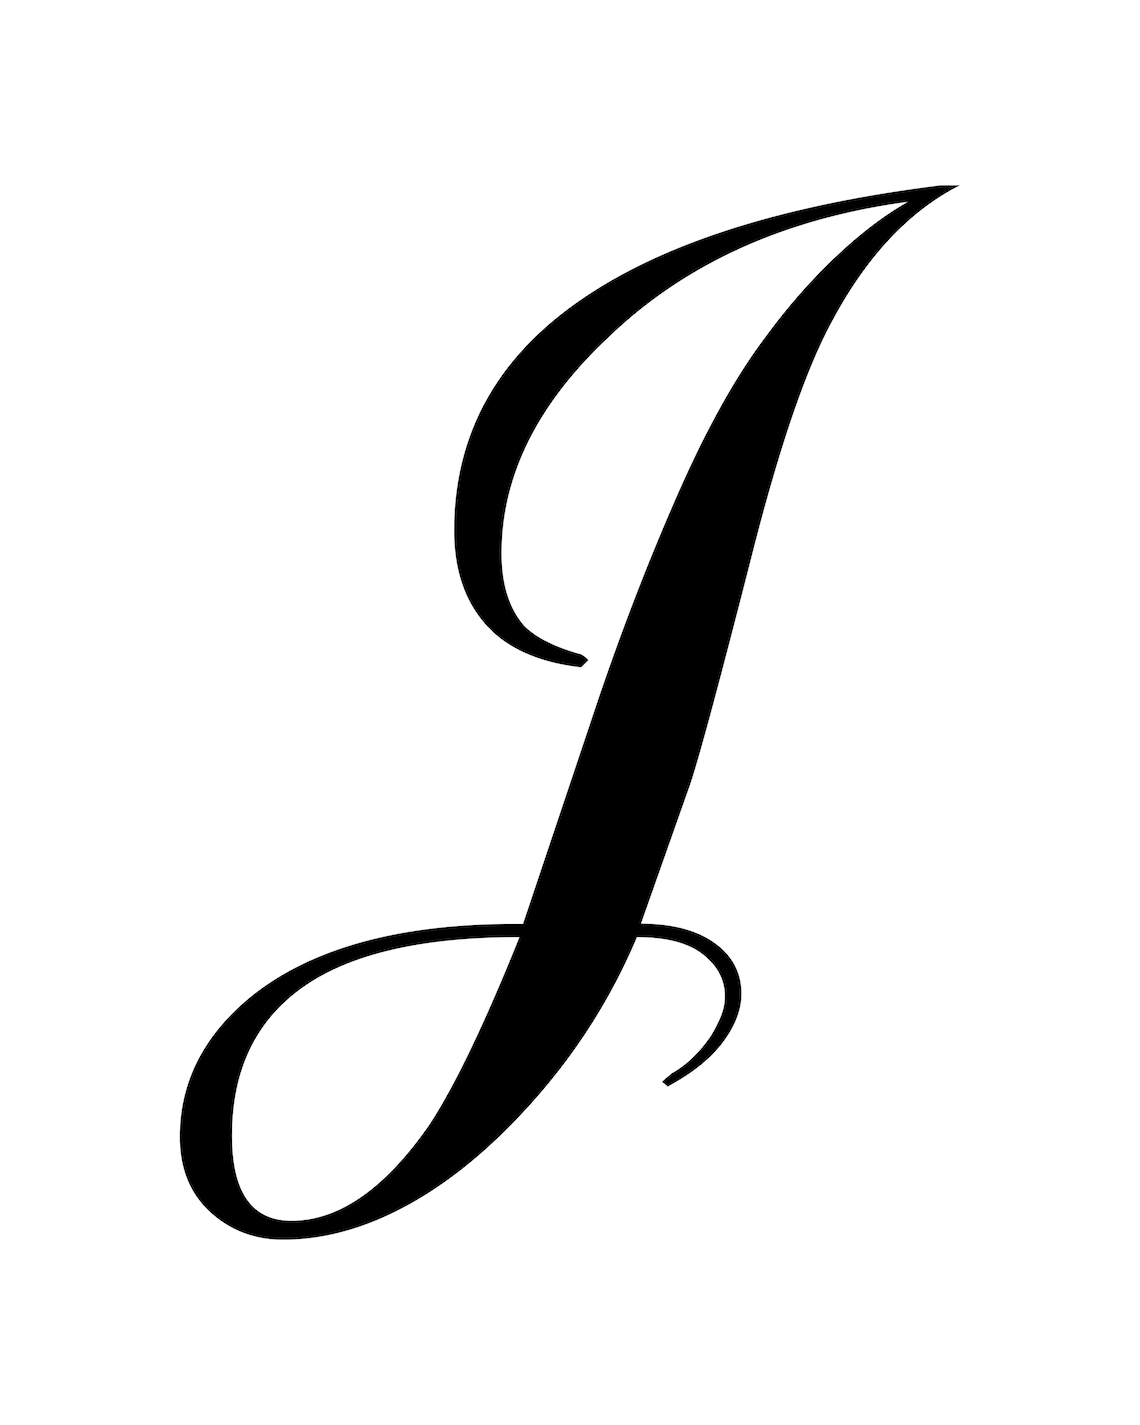
The capital j in cursive is a majestic letter, often beginning with an elaborate flourish that sets it apart. It demands a blend of control and artistry, showcasing elegant loops and a commanding presence. Learn how to form and connect the capital cursive 'j' with grace and style.Starting with Elegance: The Capital J's Unique Beginning
Unlike its lowercase counterpart, the capital 'J' often begins with an upward stroke that then curves downwards. Here's how to write a cursive capital 'j' with a video and a worksheet: 1. **The Initial Upward Sweep:** Begin the capital cursive 'j' just above the bottom line, as illustrated in many guides. Make an upward curving stroke, sweeping towards the top line. This initial stroke sets the stage for the letter's grandeur. 2. **The Grand Descent:** Once you reach the top line (or slightly above it), smoothly reverse direction, sweeping downwards with a graceful curve. This descent should be strong and confident, extending below the baseline to form the main body of the letter. 3. **The Elegant Loop:** As you approach the bottom, create a large, elegant loop that extends to the left and then curves back up to cross your initial downward stroke. This loop is a hallmark of the capital 'J', adding a touch of sophistication. 4. **The Connecting Stroke:** After the loop crosses the main stem, continue with a small upward stroke, preparing to connect to the next letter in a word. This final stroke should be smooth and flow naturally into the subsequent character.Achieving Flow and Consistency
To take your cursive handwriting to the next level with our expert guide, focus on the fluidity of the capital 'J'. The key to mastering penmanship with this guide on how to write a cursive 'j' lies in creating smooth, elegant, and consistent lettering. Pay attention to the pressure you apply throughout the stroke; a lighter touch on the upward sweeps and a slightly firmer touch on the descenders can add depth and character. The capital 'J' offers an excellent opportunity to practice long descenders and smooth upward strokes, which are important for rhythm and flow in cursive. Find out the basic structure, common mistakes, and advanced techniques for this letter to truly elevate your handwriting.Common Mistakes and How to Overcome Them
As with any skill, learning to write j in cursive comes with its own set of common pitfalls. Recognizing these mistakes is the first step towards correcting them and achieving beautiful, consistent handwriting. 1. **Incorrect Starting Point:** * **Mistake:** Starting the lowercase 'j' too low or the capital 'J' in the wrong position. * **Solution:** Remember, for lowercase 'j', you start at the top line (or just below) with a small downward curve. For the capital 'J', you begin just above the bottom line, sweeping upwards. Use lined paper with a clear midline and baseline to guide your starting points accurately. 2. **Inconsistent Loop Size and Shape:** * **Mistake:** Loops that are too wide, too narrow, or unevenly formed, making the letter look awkward. * **Solution:** Practice forming the loop repeatedly on its own. Focus on making it a consistent size and ensuring it crosses the main stem at the appropriate point. Watch video tutorials to see the precise movement and replicate it. 3. **Lack of Smoothness and Flow:** * **Mistake:** Jerky, hesitant strokes, leading to a disconnected or stiff-looking 'j'. * **Solution:** Cursive is all about continuous motion. Practice writing the 'j' in a single, fluid stroke. Don't lift your pen until the letter is complete (except for the dot on the lowercase 'j'). Focus on maintaining a steady, relaxed pace. 4. **Improper Descender Length:** * **Mistake:** The tail of the 'j' is too short or too long, throwing off the balance of the letter and the word. * **Solution:** Aim for a consistent descender length that extends roughly the same distance below the baseline as the main body of the letter extends above it. Use your lined paper as a guide to maintain uniformity. 5. **Neglecting the Dot (Lowercase 'j'):** * **Mistake:** Forgetting to dot the 'j' or placing the dot incorrectly (too big, too small, or misplaced). * **Solution:** The dot is crucial for legibility. Make it a small, distinct mark placed directly above the 'j' after you've completed the main letterform. 6. **Poor Connectivity:** * **Mistake:** The ending stroke of the 'j' doesn't flow naturally into the next letter, creating a break in the word. * **Solution:** Pay attention to the final upward stroke of both uppercase and lowercase 'j'. It should be positioned to smoothly connect to the starting point of the subsequent letter. Practice writing words that contain 'j' (e.g., "jump," "join," "jacket") to master this transition. To overcome these challenges, remember to learn the steps and tips to master both lowercase and capital cursive 'j' with practical writing exercises. Consistent practice, coupled with mindful attention to detail, will help you refine your strokes and achieve elegant, confident cursive handwriting.Practice Makes Perfect: Utilizing Resources for 'J'
Consistent practice is the cornerstone of mastering j in cursive. Fortunately, a wealth of resources is available to support your learning journey, making the process engaging and effective.Free Worksheets and Video Tutorials
One of the most effective ways to learn how to write 'j' in cursive easily is through guided practice. This article outlines practical steps to writing a cursive 'j' perfectly, and the best way to implement these steps is with dedicated practice materials. * **Printable Worksheets:** These are indispensable. You can download a free cursive writing letter 'j' worksheet to practice uppercase, lowercase 'j', and tracing for neat, confident handwriting. On this page, you will find 10 cursive letter 'j' worksheets that are all free to download or print. These printables are great teaching aids in helping students become more confident in their writing. They often include sections for tracing, freehand writing, and even writing words that contain the letter 'j'. * **Video Tutorials:** Visual learners will benefit immensely from video demonstrations. Learn how to write the letter 'j' in cursive with a free video tutorial and a printable worksheet. You can download and practice the cursive letter 'j' with Holly Stevens, a handwriting enthusiast, or learn how to write the cursive letter 'j' in both lowercase and uppercase with this video tutorial. These videos provide a dynamic view of the stroke order, pen lifts, and connectivity, making it easier to mimic the correct movements. You can also access full tutorials and worksheets for all cursive letters at MyCursive.com. * **Animations:** For a quick overview, how to write 'j' in cursive in 4 easy steps? Learn to write letter 'j' in cursive in 4 simple steps. Here's a quick animation we made of writing the cursive letter 'j' in uppercase (aka cursive capital 'j') and lowercase. You'll also find a free PDF worksheet for this letter, too! These brief, looping animations can be a great way to quickly grasp the fundamental motion.Beyond the 'J': Expanding Your Cursive Skills
While focusing on the 'j' is crucial, remember that it's part of a larger system. To truly master penmanship, you need to integrate the 'j' into words and sentences. * **Word and Sentence Practice:** Once you're comfortable with individual letter formation, practice writing words that include 'j'. This helps you understand how the 'j' connects to preceding and succeeding letters, improving your overall flow and consistency. Find more cursive resources, such as books, sentences, and text generators, on MyCursive.com. * **Explore Full Resources:** Don't limit yourself to just one letter. MyCursive.com offers a wealth of resources for all cursive letters, allowing you to build a comprehensive understanding of the entire alphabet. Mastering the 'j' is a significant step, but the journey of beautiful handwriting encompasses all letters and their harmonious interaction. By consistently utilizing these resources, you'll not only perfect your j in cursive but also develop a confident, elegant handwriting style that you can be proud of.Expert Tips for Confident Handwriting
Beyond the mechanics of forming each letter, developing confident and beautiful cursive handwriting involves a holistic approach. Here are some expert tips to guide you on your journey to mastering the j in cursive and beyond: 1. **Maintain a Relaxed Grip:** A common mistake is gripping the pen too tightly. This leads to hand fatigue and stiff, inconsistent strokes. Hold your pen or pencil gently, allowing your fingers to move freely. Imagine you're holding a delicate bird – firm enough not to drop it, but not so tight as to crush it. 2. **Proper Posture and Paper Position:** Sit upright with both feet flat on the floor. Position your paper slightly angled, typically aligned with your forearm, which allows for a natural, flowing movement of your hand and arm. This ergonomic setup reduces strain and promotes better control. 3. **Practice Consistently, Not Just Intensively:** Short, regular practice sessions are more effective than infrequent, long ones. Dedicate 10-15 minutes each day to handwriting practice. This builds muscle memory and reinforces correct habits over time. 4. **Focus on Rhythm and Flow:** Cursive is about fluidity. Instead of thinking of individual strokes, try to envision the entire letter or word as a continuous motion. The letter 'j' is excellent for practicing long descenders and smooth upward strokes, which are important for rhythm and flow in cursive. Develop a steady, even pace as you write. 5. **Observe and Imitate:** Pay close attention to how expert calligraphers or handwriting enthusiasts form their letters. Watch video tutorials repeatedly, like those featuring Holly Stevens, and try to mimic their movements. Understanding the nuances of their technique can provide valuable insights. 6. **Don't Fear Imperfection:** Your first attempts won't be perfect, and that's completely normal. Embrace the learning process. Each stroke, even a flawed one, provides feedback. Analyze what went wrong and adjust your next attempt. The goal is progress, not instant perfection. 7. **Write Real Words and Sentences:** Once you're comfortable with individual letters, start writing words and then full sentences. This helps you understand connectivity and how letters interact within a natural writing context. This also makes practice more engaging and relevant. 8. **Enjoy the Process:** Handwriting should be a pleasurable activity, not a chore. Appreciate the beauty of the script you're creating. As you see your handwriting improve, it becomes a rewarding and meditative practice. By integrating these expert tips into your practice routine, you'll not only master the intricacies of the cursive 'j' but also cultivate a confident, elegant, and uniquely personal handwriting style that will serve you well for a lifetime.Conclusion
The journey to master j in cursive is a rewarding endeavor, one that hones your fine motor skills, enhances cognitive function, and adds a touch of timeless elegance to your personal communication. We've explored the unique benefits this letter offers, from perfecting long descenders to achieving seamless flow, and delved into the specific nuances of D'Nealian cursive, the widely adopted style in the US. We've also armed you with essential tools, step-by-step guides for both lowercase and capital 'j', strategies to overcome common mistakes, and a wealth of resources to support your practice. Remember, the path to beautiful handwriting is paved with consistent effort and a willingness to learn. The 'j' might seem challenging at first, but with the right guidance and dedicated practice, you'll soon be forming it with grace and confidence. The rhythm and fluidity you develop while mastering this letter will undoubtedly elevate your entire cursive script. Ready to put pen to paper and transform your handwriting? **Download your free PDF worksheets for the cursive 'j' today and begin your practice!** Share your progress in the comments below, or explore more comprehensive cursive resources, including books, sentences, and a text generator, on mycursive.com. Let your elegant 'j' be the first step towards a truly confident and beautiful cursive hand.