Have you ever felt a little spark inside, a desire to create something beautiful, but then thought, "Oh, I could never draw that"? Well, that feeling is pretty common, and it often holds people back from trying. But what if I told you that learning how to draw a girl easy is not just possible, but actually quite fun and simple? It's true! You don't need to be a seasoned artist with years of practice to begin making charming sketches. So, you know, maybe it's time to give it a try.
Many people believe drawing is some kind of magical talent only a few possess. However, it's really more about breaking things down into smaller, manageable pieces, and then just putting those pieces together. We're going to explore a straightforward method that helps you see complex shapes as simple forms, making the whole process less intimidating. You'll find that with a few basic steps and a little bit of patience, you can create lovely drawings. This approach, you see, is for anyone who wants to pick up a pencil or, perhaps, use a digital drawing tool.
This guide will walk you through the core ideas and practical steps needed to draw a girl with ease. We'll start with the very basics, like the tools you might want to use, and then move on to building figures from simple shapes. By the time you finish reading, you'll have a clear path to follow, allowing you to start sketching with confidence and, like, really enjoy the process. You might even surprise yourself with what you can create today.
Table of Contents
- Getting Started: What You Need
- The Core of Drawing: Simple Shapes
- Step-by-Step: Drawing a Girl's Face Easily
- Building the Body: Simple Steps
- Bringing Your Drawing to Life: Tips for Expression
- Practice Makes Progress: Keeping Your Skills Sharp
- Frequently Asked Questions About Drawing Girls
Getting Started: What You Need
Before you even make your first mark, it's pretty helpful to have a few things ready. You don't need a lot of fancy supplies, just some basic items to get you going. Honestly, you probably have most of them around your house already. So, you know, it's not a big investment to start.
Basic Tools
For traditional drawing, a simple pencil is your best friend. A regular graphite pencil, perhaps a HB or 2B, works wonderfully for sketching. You'll also want an eraser, maybe a kneaded one, which is kind of soft and doesn't smudge as much. Paper is, of course, essential; any plain paper will do for practice. A small sketchbook is also a good idea for drawing on the go, or, you know, just for keeping all your practice pieces in one place.
If you prefer digital art, a tablet and stylus are what you'll use. There are many free online drawing applications available, which is pretty convenient. These applications often have all the tools you need built right in, so you don't have to buy anything extra. They can be a great way to experiment with different brushes and colors without making a mess, which is, like, a big plus for many people.
Setting Up Your Workspace
Find a comfortable spot with good lighting. A clear table or desk is usually best. Make sure you have enough room to move your arm freely. If you're using a digital tool, ensure your device is charged and your drawing application is ready to go. A quiet space can help you focus, which, honestly, makes a big difference in how well you concentrate on your drawing. You might want to put on some calming music, too, if that helps you relax and concentrate.
The Core of Drawing: Simple Shapes
The secret to drawing anything, especially when learning how to draw a girl easy, is to see it as a collection of simple shapes. Forget about complex details for a moment. Think about circles, ovals, squares, and triangles. These are your building blocks, the very foundation of your drawing. This method, you know, really simplifies things for beginners.
Head Basics: Circles and Lines
A girl's head can start as a simple circle. That's right, just a plain circle. From that circle, you can add lines to mark where the eyes, nose, and mouth will go. One line goes down the middle vertically, and another goes across horizontally, roughly halfway down the circle. These lines, you see, help you place features evenly later on. It's almost like a little map for the face.
You can then shape the chin and jawline by drawing lines from the bottom of the circle downwards, creating a more defined face shape. This step helps turn that basic circle into something that looks more like a head. It's a bit like sculpting, but with a pencil. Just take your time with it, and, you know, don't worry about making it perfect right away.
Body Framework: Stick Figures and Ovals
For the body, start with a stick figure. This is a quick way to get the pose and proportions right. A line for the spine, lines for the arms and legs, and circles for the joints (shoulders, elbows, knees). This basic skeleton, you know, gives you a framework to build upon. It's a very simple way to plan out the whole body before adding any volume.
Once your stick figure is in place, you can add ovals and cylinders to give the body volume. An oval for the chest, another for the hips, and cylinders for the arms and legs. This transforms your stick figure into a more solid form. It's kind of like putting flesh on bones, but, you know, in a drawing sense. Remember, these are just guide shapes, so keep them light and easy to erase.
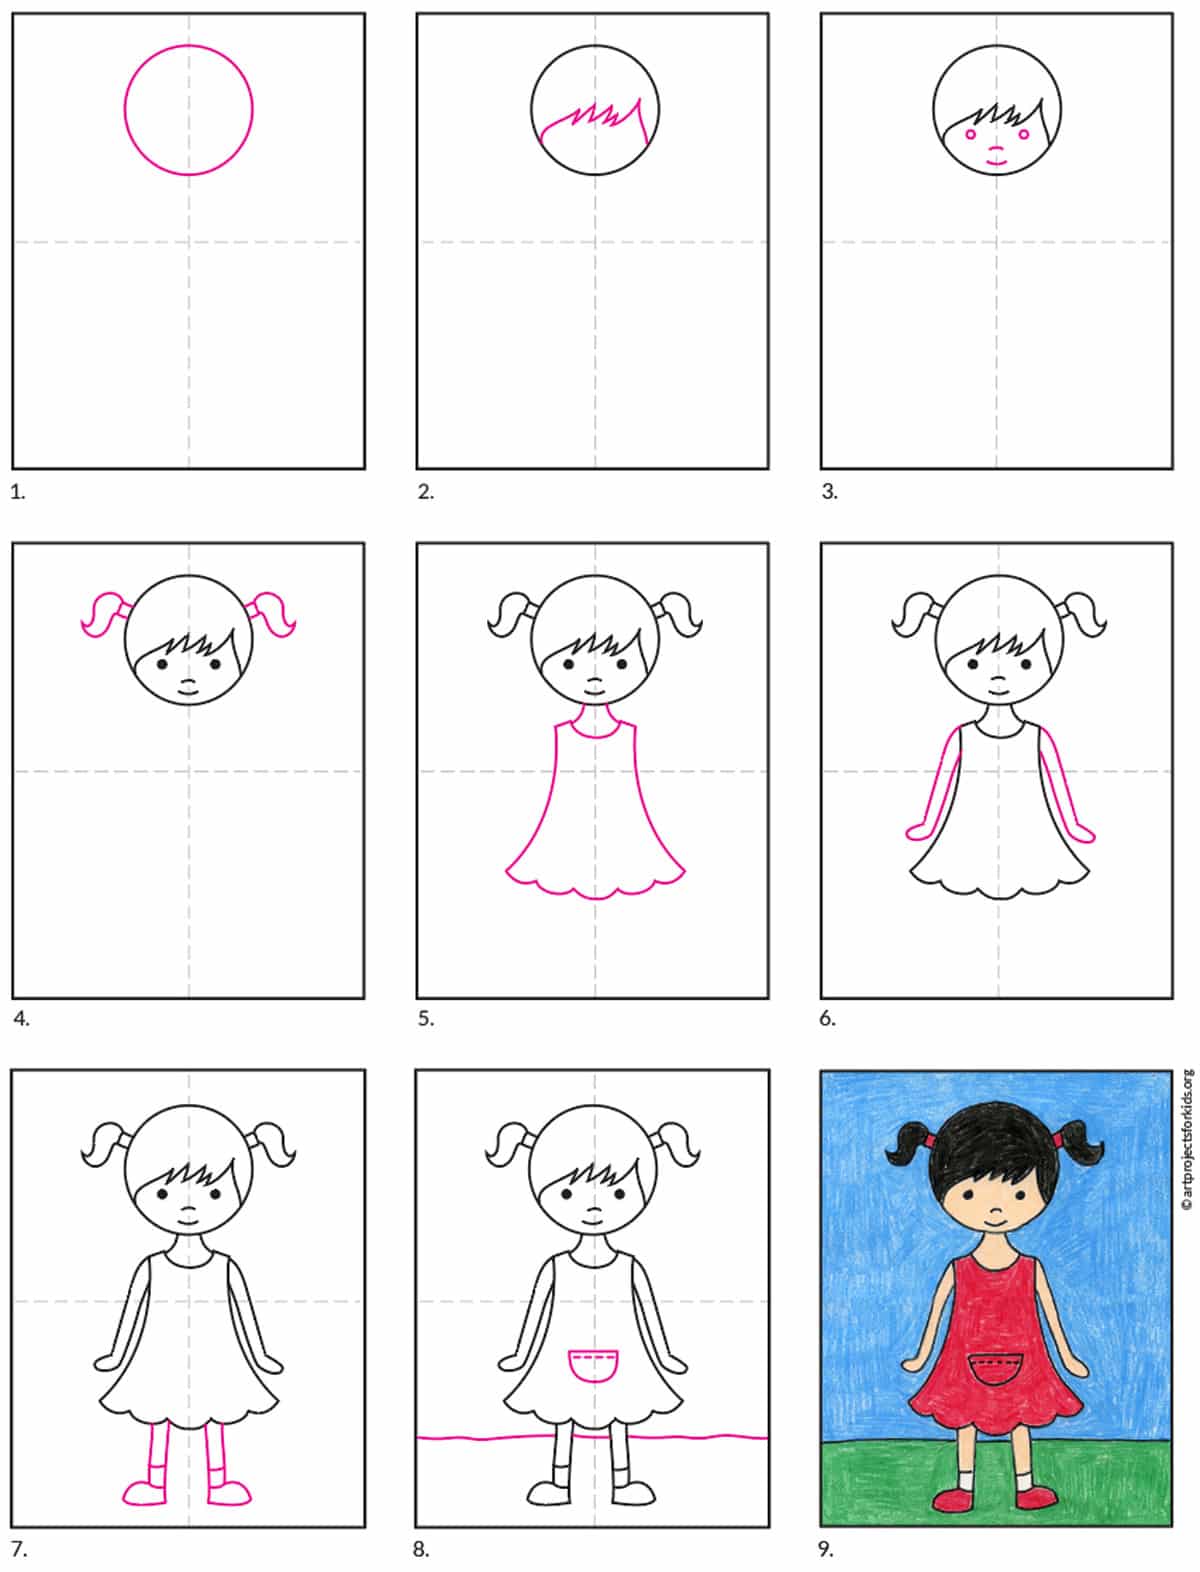
Step-by-Step: Drawing a Girl's Face Easily
Now that you have the basic shapes down, let's put them to use and draw a face. This part can feel a little tricky, but by following these simple steps, you'll find it's pretty manageable. It's all about breaking it down, you see, into smaller, more digestible bits.
Starting with the Head Shape
Begin with that initial circle. Then, draw the vertical line down the center and the horizontal line for the eyes. These guide lines are super helpful for symmetry. Below the circle, extend two lines downwards to form the jawline and chin. This creates the basic shape of the head. It's almost like drawing an upside-down egg, or, you know, a very smooth pear.
Once you have the head shape, you can refine it slightly. Maybe make the chin a little pointier or rounder, depending on the look you're going for. Remember, these are just starting points, and you can always adjust them. You're basically creating a canvas for the features that will come next. Just take your time with it, and, you know, don't rush this initial stage.
Placing Features: Eyes, Nose, Mouth
The horizontal line you drew earlier is where the eyes will go. Draw two almond-shaped forms on this line, leaving a space between them roughly the width of one eye. For the nose, draw a small, simple shape like a triangle or a subtle curve about halfway between the eye line and the chin. The mouth typically sits between the nose and the chin. A simple curved line for the top lip and another for the bottom lip works well. This placement, you know, really helps make the face look balanced.
Don't worry about drawing perfect eyes or a perfectly sculpted nose right away. Simple shapes are fine. You can add more detail later. For instance, for the eyes, just a circle for the iris and a smaller dot for the pupil is plenty. You're just getting the basic layout done, and, you know, building confidence with each small step.
Adding Hair and Details
Hair can seem complex, but think of it as large shapes or masses first. Don't draw individual strands. Instead, sketch the overall outline of the hairstyle. Is it long? Short? Curly? Straight? Once you have the main shape, you can add a few lines within it to suggest texture or movement. This approach, you see, makes hair much easier to handle.
For other details, consider eyebrows above the eyes, and maybe some simple ears on the sides of the head, roughly between the eye line and the nose line. You can add a neck by drawing two lines downwards from the jaw to connect to the body. These small additions really bring the face to life. Just remember to keep things simple at first, and, you know, add more complexity as you feel more comfortable.
Building the Body: Simple Steps
After getting the face down, building the body is the next step. Again, we'll rely on those basic shapes and the stick figure framework. It's all about making connections and adding volume in a logical way. This method, you know, keeps everything pretty straightforward.
From Stick Figure to Form
Take your initial stick figure. Now, using those ovals and cylinders we talked about, begin to flesh out the limbs and torso. For the arms, draw cylinders from the shoulder circles to the elbow circles, and then from the elbow circles to the wrist circles. Do the same for the legs, from hip ovals to knee circles, and then to ankle circles. An oval for the chest and another for the hips connect to the spine line. This process, you see, transforms your simple skeleton into a more complete form.
Think about how the body parts connect. The shoulders and hips are wider than the waist. The arms and legs taper slightly. Don't worry about perfect anatomy at this stage. The goal is to get the general shape and proportions right. It's almost like building a simple mannequin, or, you know, a basic doll shape, before adding clothes.
Adding Clothes and Accessories
Drawing clothes is easier than you might think. Instead of drawing the body underneath and then putting clothes on top, draw the clothes directly over your basic body shapes. Think about how fabric drapes and folds. Simple lines can suggest creases and wrinkles. For example, a simple dress might be just a few lines extending from the shoulders and waist. This is, you know, a pretty effective way to dress your figure.
Accessories like shoes, bags, or hats can be added with simple shapes too. A triangle for a shoe, a rectangle for a bag. These small details can really add personality to your drawing. Just remember to keep them in proportion with the rest of the figure. You're basically adding layers of detail onto your basic form, and, you know, it's quite satisfying to see it come together.
Bringing Your Drawing to Life: Tips for Expression
Once you have the basic structure, you can start to add some life to your drawing. Expression is what makes a character feel real and relatable. A few small changes can make a big difference. It's honestly a pretty fun part of the process.
Emotions Through Eyes and Brows
The eyes and eyebrows are incredibly important for showing feelings. Slightly changing the curve of an eyebrow can convey surprise, anger, or sadness. For instance, raised eyebrows might suggest curiosity, while furrowed brows could mean concentration. The shape of the mouth also plays a big part. A slight upturn for a smile, a downturn for a frown. These small adjustments, you know, really bring out the character's mood.
Even the size of the pupils or the direction of the gaze can add to the expression. Wide eyes might show fear or excitement, while narrowed eyes could suggest suspicion. Experiment with different combinations to see how they change the overall feeling of the face. It's almost like acting with your pencil, or, you know, giving your drawing a personality.
Poses and Gestures
The way a girl stands or holds her arms can tell a story. A confident pose might have shoulders back and hands on hips. A shy pose might involve slumped shoulders and hands clasped. Think about what your character is doing or feeling, and then try to show that through her body language. This adds a lot of depth to your drawing. It's pretty cool how much you can say without words.
Simple gestures, like a hand waving or a finger pointing, can make your drawing more dynamic. Remember to use your stick figure as the base for these poses. It helps you get the balance and movement right before you add the volume. You're basically giving your character a moment in time, and, you know, making her seem more alive.
Practice Makes Progress: Keeping Your Skills Sharp
Drawing is a skill that grows with practice. The more you do it, the better you'll become. Don't get discouraged if your first few drawings aren't exactly what you hoped for. Every artist starts somewhere. This is, you know, a very important part of learning any new skill.
Daily Sketching Habits
Try to draw a little bit every day, even if it's just for ten minutes. Consistent practice is far more effective than drawing for hours once a month. Sketching things around you, or even just doodling, can help improve your hand-eye coordination and observation skills. It's almost like exercising a muscle, or, you know, keeping your creative flow going.
Keep a sketchbook handy, or have your digital drawing application ready to open quickly. The more you draw, the more natural it will feel. Don't be afraid to make mistakes; they are part of the learning process. Each drawing, you see, is a step forward, no matter how small.
Exploring Digital Art Tools
Using a free online drawing application can be a fantastic way to practice. These tools, like the one that lets you create digital artwork to share online and export to popular image formats jpeg, png, svg, and pdf, offer so much flexibility. You can easily draw, edit photos, or even design your next business card with them. They often let you undo mistakes with a tap, which is pretty helpful for beginners. You can try different brush styles, too, by just drawing the letter “s” to take a shortcut to the style chooser, which is, like, a really neat feature.
Digital tools also allow you to experiment with colors and textures without needing lots of physical supplies. You can make quick photo edits with a drag and drop feature, or craft images for social media posts, digital ads, paper, or even apparel. This versatility makes them a great resource for learning and creating. So, you know, give a free online drawing application a try; it might just be what you need to boost your drawing journey. You can learn more about digital art tools and techniques on our site, too.
Sharing Your Creations
Don't be shy about sharing your drawings! Show them to friends or family, or even post them online. Getting feedback can be helpful, and seeing others enjoy your work is very encouraging. Many free online drawing applications let you create digital artwork to share online, which is pretty cool. This can be a great way to connect with other artists and get inspired. You're basically putting your art out there, and, you know, that's a big step for any artist.
Remember, every artist starts somewhere. Your journey of learning how to draw a girl easy is unique. Celebrate your progress, no matter how small it seems. The joy is in the creation itself, and in the continuous learning. Just keep drawing, and, you know, keep having fun with it.
Frequently Asked Questions About Drawing Girls
Here are some common questions people often ask when they're learning how to draw a girl easy. These might help you too, as, you know, many people face similar starting points.
How do you draw a simple girl?
You draw a simple girl by starting with basic shapes: a circle for the head, a stick figure for the body's pose, and then ovals and cylinders to add volume to the limbs and torso. Then, you place features on the face using guide lines and add simple shapes for hair and clothing. It's pretty much about building up from the most basic forms, which, you know, makes it much less complicated than it sounds.
What are the basic shapes to draw a girl?
The basic shapes to draw a girl are circles (for the head and joints like shoulders, elbows, knees), ovals (for the torso and hips), and cylinders (for the arms and legs). You also use straight lines for the initial stick figure skeleton and for guide lines on the face. These shapes are, like, the fundamental building blocks that help you get the proportions and pose right before adding details. It's a very simple way to start any drawing.
How do you draw a girl's face step by step for beginners?
For a beginner, you draw a girl's face step by step by first drawing a circle. Then, add a vertical line down the middle and a horizontal line for the eyes. Extend lines downwards from the circle to form the jaw and chin. Place simple almond shapes for eyes on the horizontal line, a small