Have you ever gazed into someone's eyes and felt a story unfold? Eyes are often called the windows to the soul, and in art, they are undoubtedly the most expressive feature of any portrait. Mastering the art of drawing eyes can transform your artwork from good to truly captivating, imbuing your characters with emotion, depth, and life. If you've ever felt intimidated by the complexity of drawing realistic or even stylized eyes, you're in the right place. This comprehensive guide will show you exactly how to draw eyes easy, breaking down the process into simple, manageable steps that even absolute beginners can follow.
Whether your goal is to sketch lifelike portraits, create expressive anime characters, or delve into the world of comics, understanding the fundamentals of eye drawing is your first step towards artistic success. We'll explore everything from basic anatomy to advanced shading techniques, ensuring you gain the confidence and skills to draw a variety of eye styles. Get ready to grab your pencil and sketchbook, because by the end of this tutorial, you'll be well on your way to drawing eyes that truly pop!
Table of Contents
- Understanding the Foundation: Why Eye Anatomy Matters
- Gathering Your Simple Tools: What You Need to Begin
- The Universal 5-Step Method to Draw Any Eye
- Bringing Eyes to Life: Shading Techniques for Depth
- Exploring Different Eye Styles: Beyond Realism
- Common Pitfalls to Avoid When Drawing Eyes
- Practice Makes Perfect: Your Journey to Mastery
- Last Updated & Future Learning
Understanding the Foundation: Why Eye Anatomy Matters
Before you can truly learn how to draw eyes easy, it's incredibly helpful to grasp the fundamental anatomy of the human eye. Don't worry, you don't need to be an ophthalmologist, but a basic understanding of its structure will dramatically improve your drawings. The eye isn't just a flat shape; it's a sphere nestled within a socket, protected by eyelids and framed by eyebrows. This spherical nature is key to giving your drawings depth and realism. You first need to know their basic shapes to learn how to draw eyes. The eyeball itself is a sphere. The eyelids wrap around this sphere, creating curves. The iris is a perfect circle, and the pupil is a smaller, darker circle within it. Understanding these foundational shapes will allow you to construct eyes accurately, no matter the angle or expression. And that’s exactly what we’re doing in this article – building from the ground up. By learning eye anatomy, you'll naturally understand how light interacts with the eye, how eyelids create folds, and how the overall structure contributes to a lifelike appearance. This knowledge is crucial for developing effective shading techniques and accurately depicting common eye shapes for lifelike portraits.Gathering Your Simple Tools: What You Need to Begin
One of the best things about learning how to draw eyes easy is that you don't need a fancy art studio or expensive supplies. In fact, you only need a pencil and your sketchbook to follow along with this tutorial. For beginners, a simple HB or 2B pencil is perfect for sketching outlines. If you want to dive deeper into shading and achieve a more realistic look, having a range of pencils, such as a soft pencil (like a 4B or 6B, or even a Doms Zoom Ultimate Dark pencil as some artists prefer for deep shadows), can be incredibly beneficial. An eraser (kneaded or vinyl) and a blending stump (or even a cotton swab) will also be useful for refining your work. Remember, the focus here is on technique, not on expensive tools. You can achieve incredible results with just one pencil, demonstrating that the artist's skill is far more important than the cost of their materials.The Universal 5-Step Method to Draw Any Eye
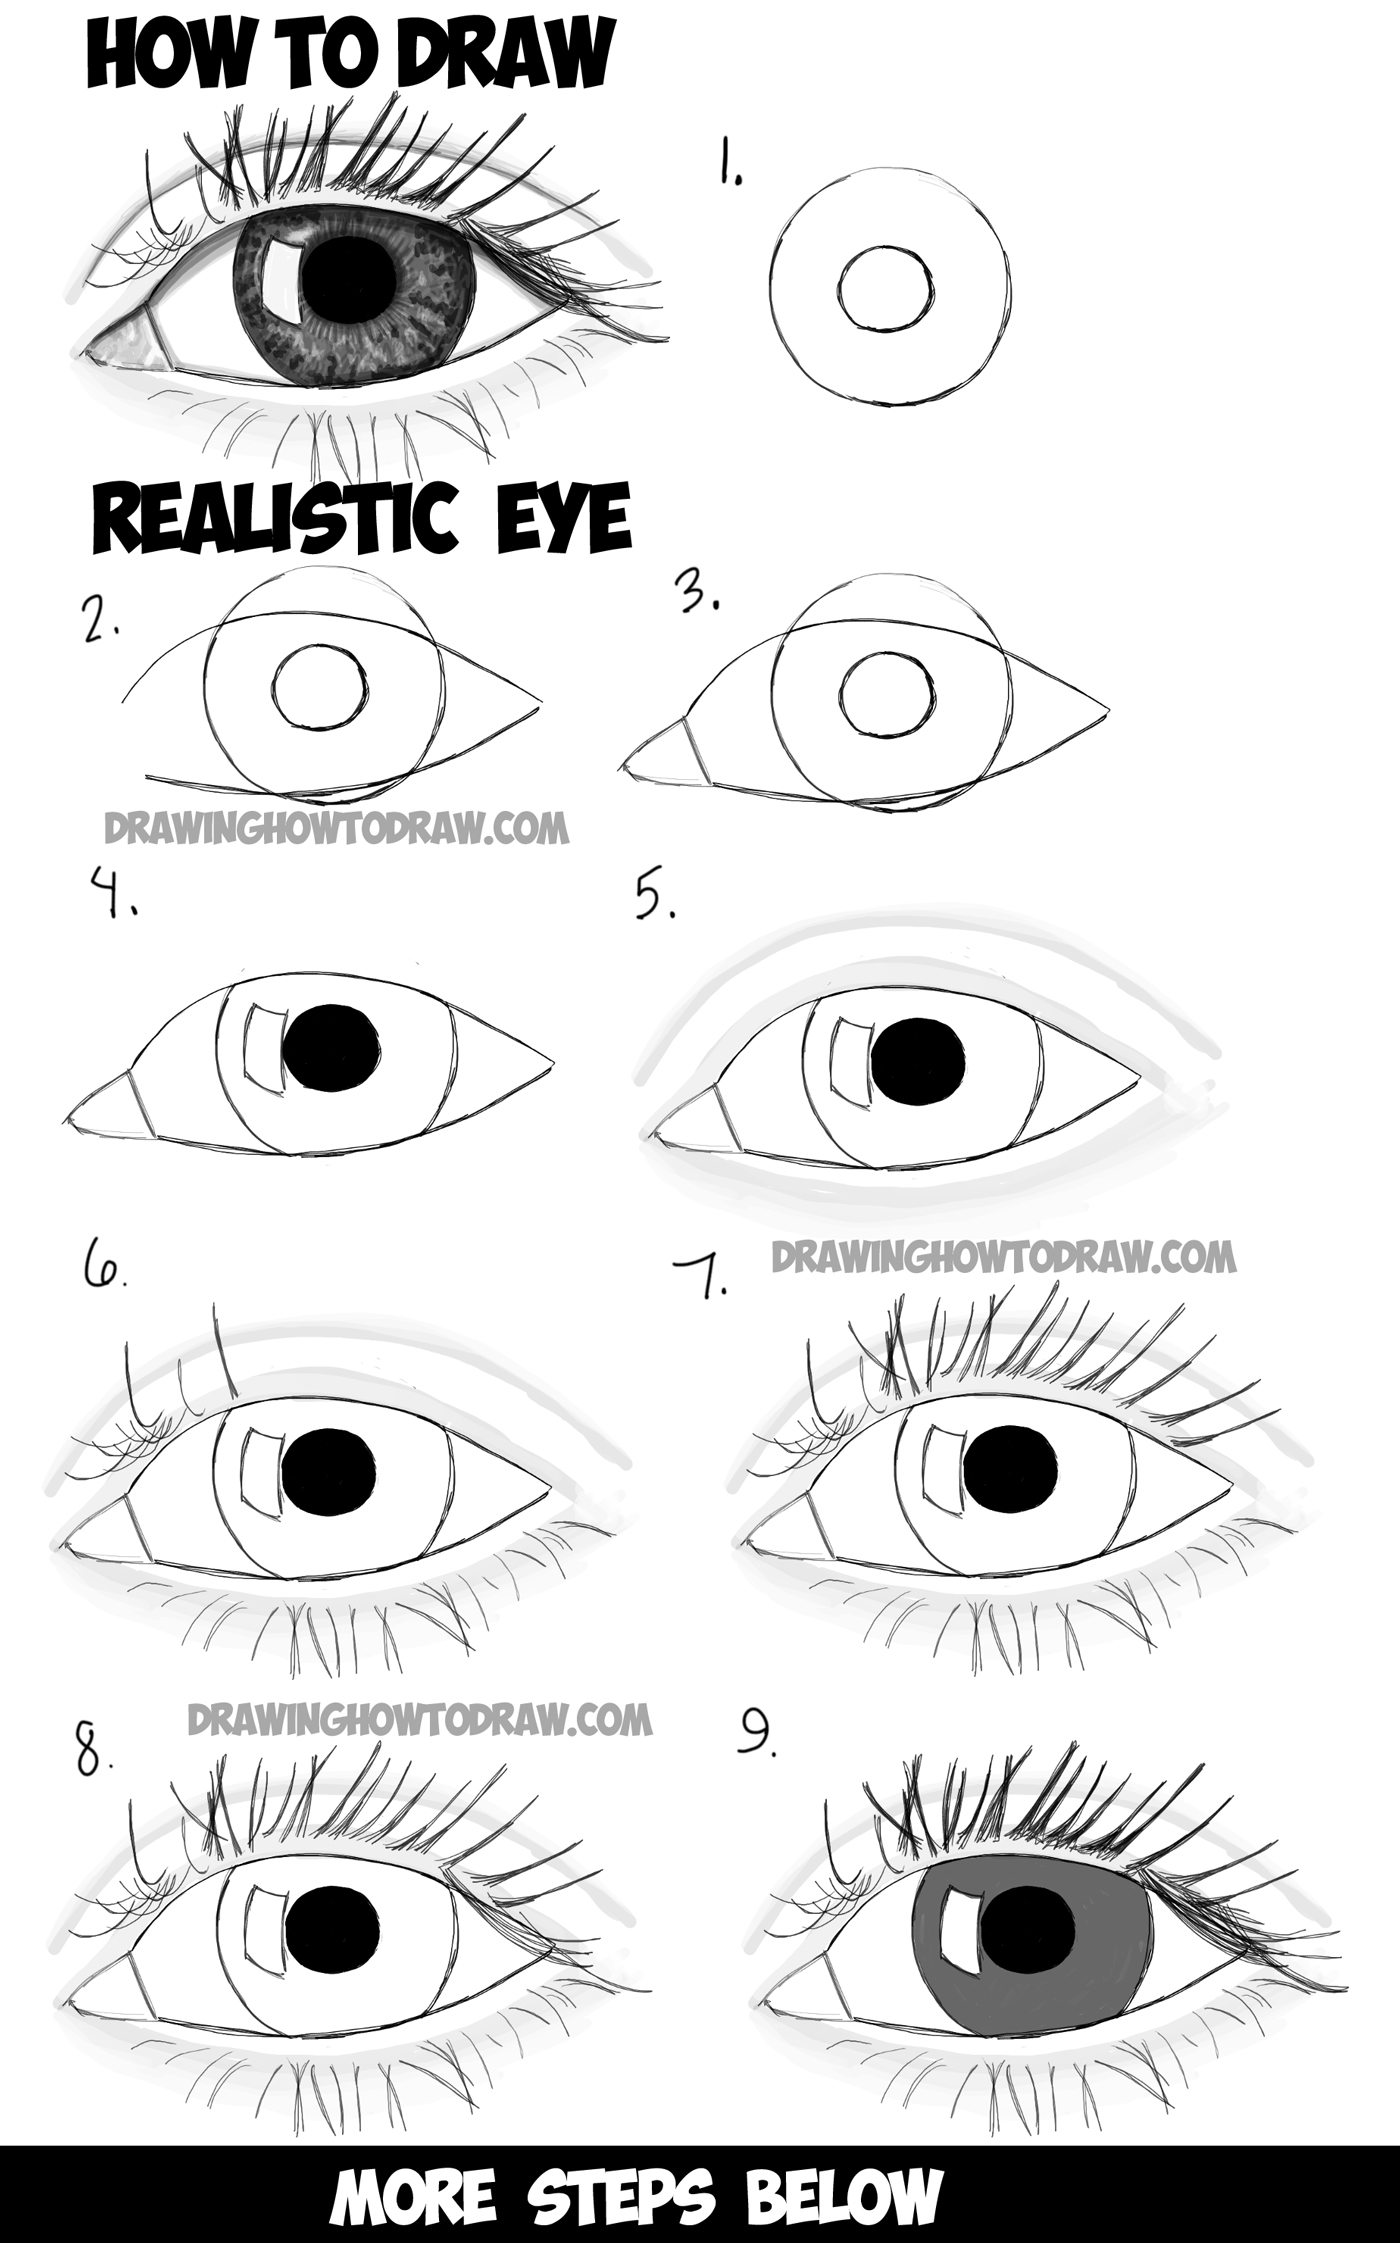
Ready to learn how to draw an eye? This method simplifies the process into five core steps that you can apply to almost any eye, regardless of style. After these five steps, we’ll delve into shading to make the drawing look realistic and add that vital depth. This easy way to draw a realistic eye for beginners step by step focuses on building the structure before adding details, ensuring a solid foundation for your artwork.Step 1: Sketching the Basic Outline
Begin by lightly sketching the outline of the eye with a soft pencil. Think of it as an almond shape, or even two slightly curved lines meeting at the corners. Don't press too hard, as these lines are just guides and will be refined later. This initial sketch establishes the overall size and angle of the eye. This is your foundational shape, and getting it right here will make the subsequent steps much easier. Remember, we're aiming for an easy way to draw eyes, so keep your lines loose and exploratory at this stage.Step 2: Defining the Iris and Pupil
Next, draw the outline of the iris and pupil. Remember, the iris is a perfect circle, and typically, parts of it are covered by the upper and lower eyelids. So, you'll usually see an arc of the circle, not the full circle, unless the eye is wide open. Within the iris, define the circle of the pupil – this is the darkest part of the eye and should be perfectly centered within the visible part of the iris. Getting these circles right is crucial for the eye's expression and realism. Pay attention to how much of the iris is visible; this can convey emotions from surprise to sleepiness.Step 3: Adding the Eyelids and Tear Duct
Now, let's add the eyelids. The upper eyelid typically has a visible fold above it, especially when the eye is open. Draw this fold to give the eye depth. For the lower eyelid, draw a subtle line below the eye outline. Don't forget the tear duct, a small, fleshy bump in the inner corner of the eye. This small detail adds a lot to the realism of your drawing. These lines define the three-dimensional form of the eye as it sits within the socket.Step 4: Placing the Eyebrow
While not directly part of the eyeball, the eyebrow is essential for framing the eye and conveying emotion. Lightly sketch the general shape and position of the eyebrow above the eye. Consider its thickness, arch, and how it tapers at the ends. The eyebrow's position relative to the eye can drastically change the perceived emotion, from anger to surprise to sadness.Step 5: Refining the Shape and Proportions
With the basic structure in place, it's time to refine your lines. Erase any unnecessary sketch lines and solidify the outlines of the eye, iris, pupil, and eyelids. Pay attention to the proportions. Is the iris too big or too small? Are the eyelids curving naturally around the spherical eyeball? This step is about making subtle adjustments to ensure everything looks harmonious and anatomically correct. This 5-step method is a foundational approach to how to draw eyes easy, providing a solid base before moving on to the magic of shading.Bringing Eyes to Life: Shading Techniques for Depth
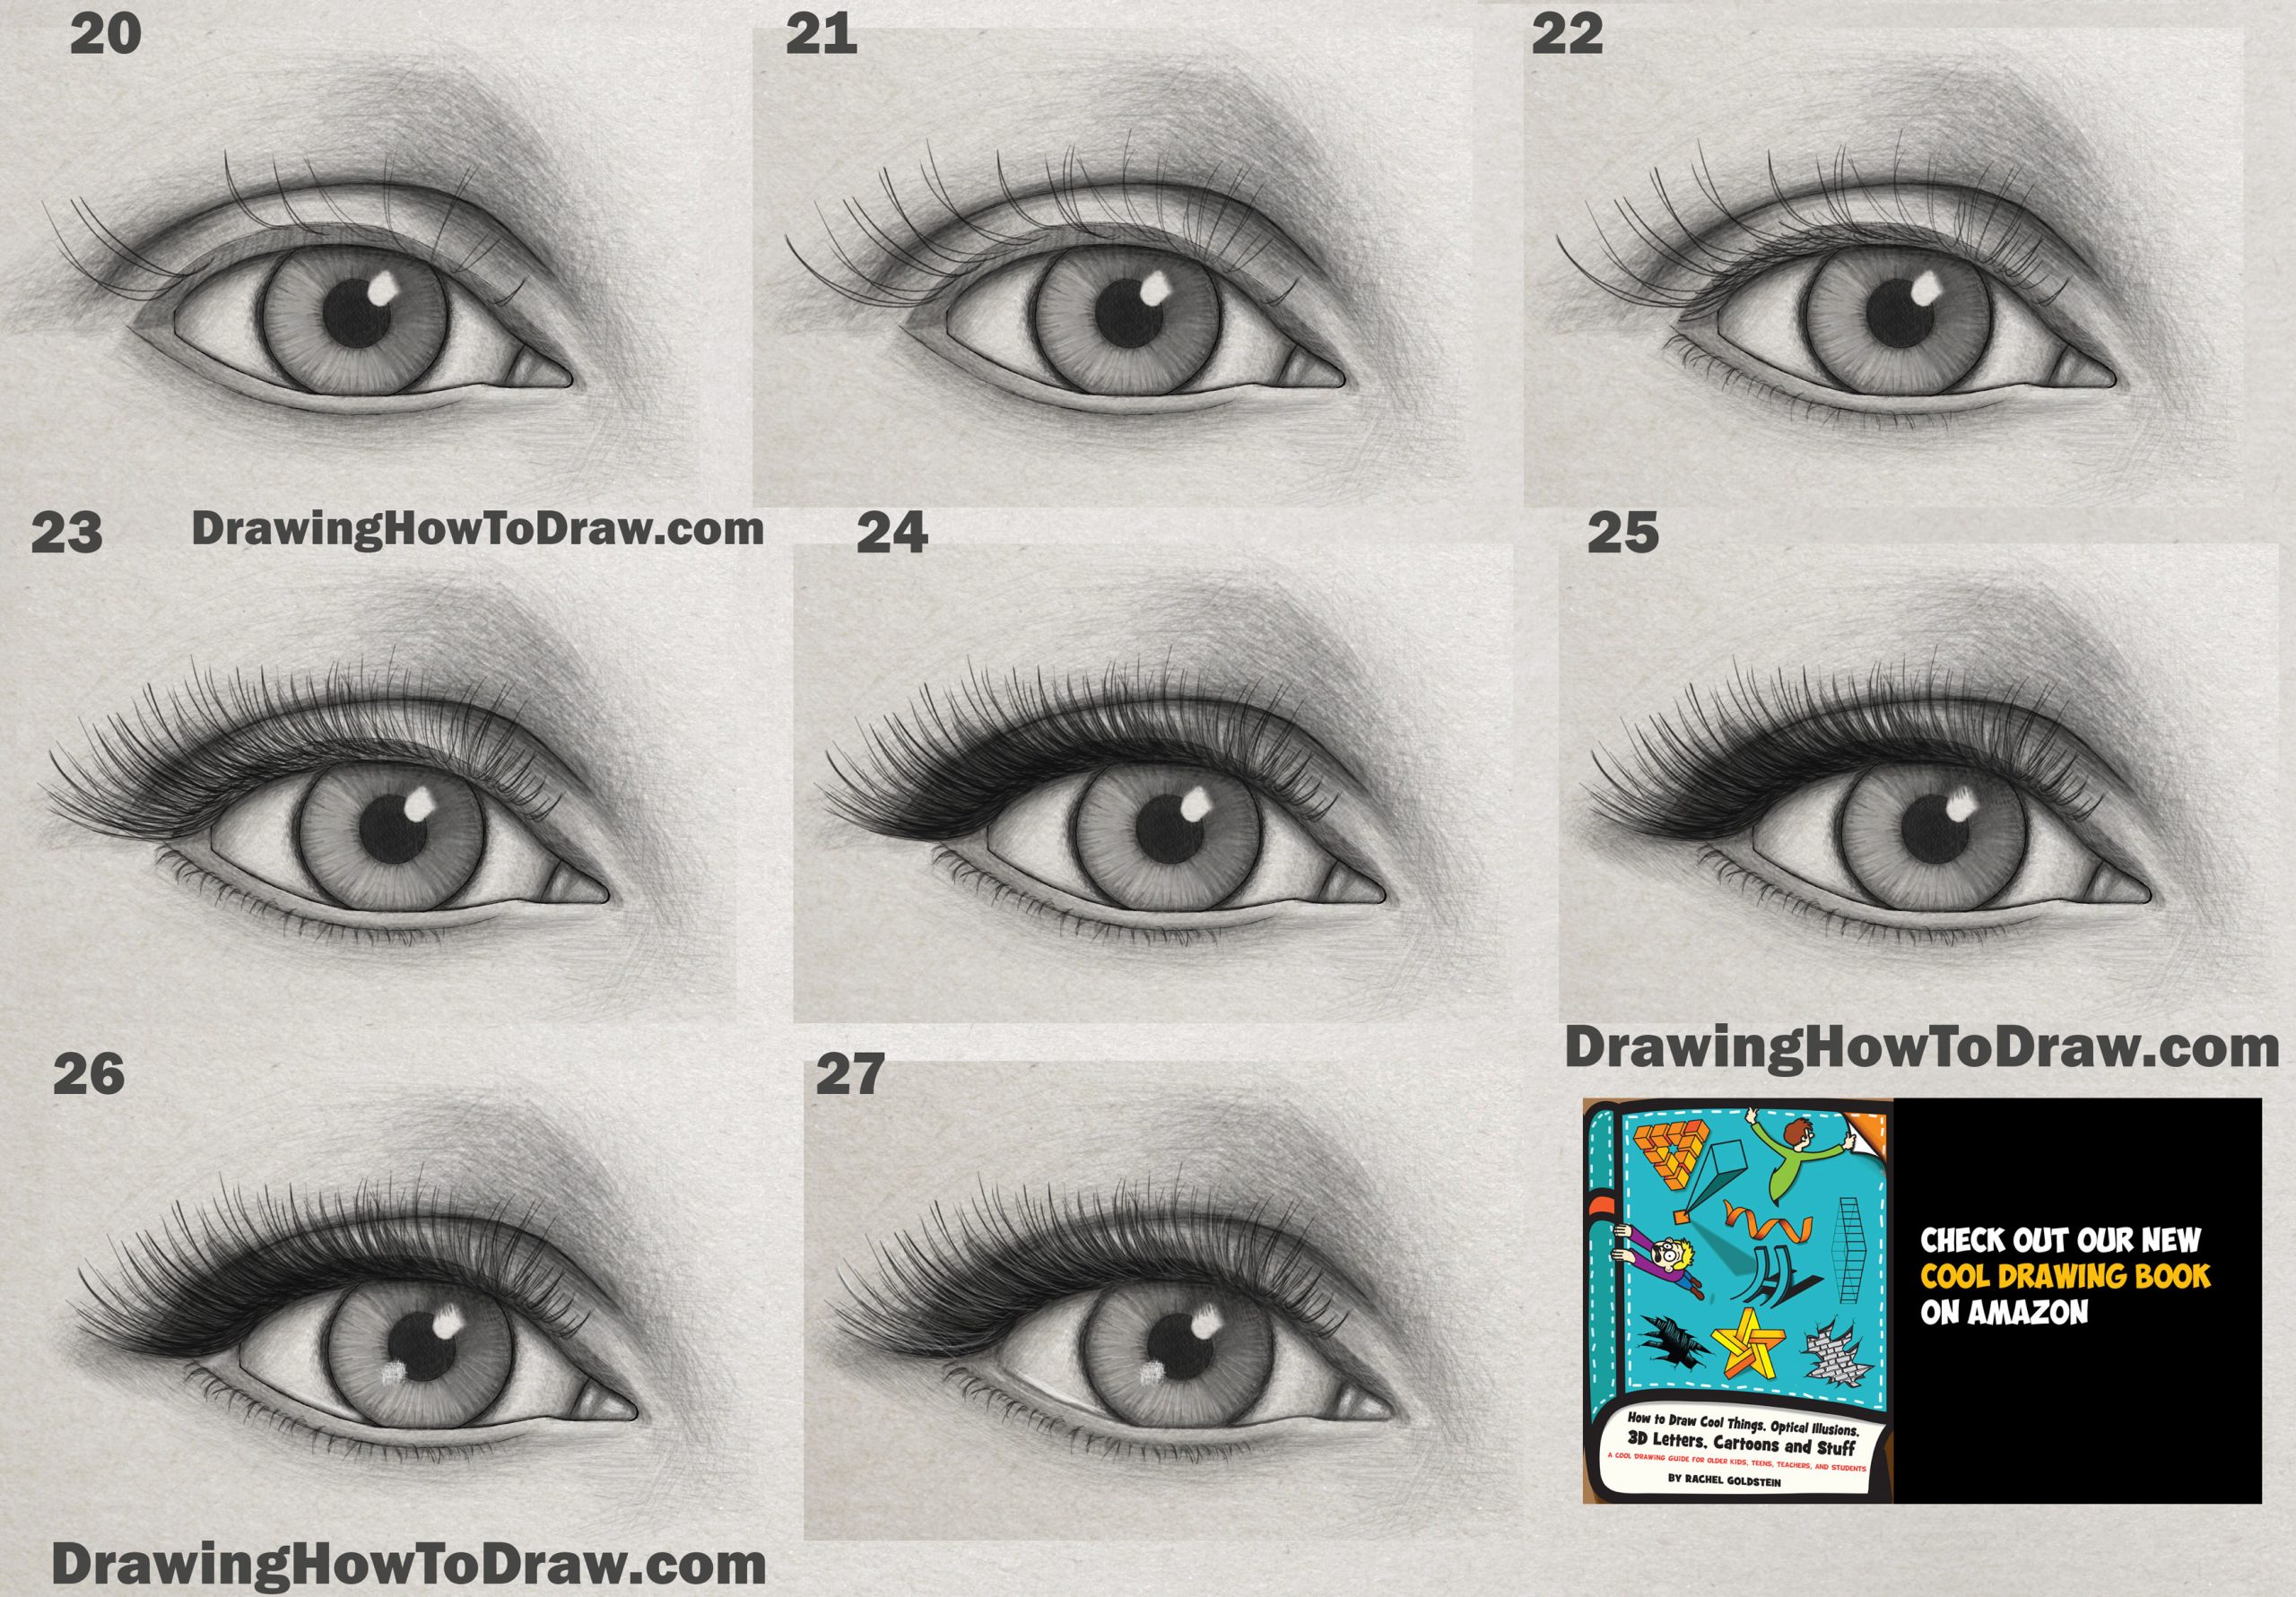
After these five steps, we’ll shade the drawing to make it look realistic. Shading is where the magic happens; it transforms a flat outline into a three-dimensional form. To give your eyes depth and life with this detailed tutorial, focus on understanding light and shadow. Start by identifying your light source. This will determine where the highlights (brightest areas) and shadows (darkest areas) fall. The pupil is usually the darkest part of the eye. The iris will have variations in tone, often darker around the edges and lighter towards the center, with radial lines adding texture. A crucial element is the highlight on the iris – a small, bright spot that indicates where the light source is reflecting. This highlight is essential for making the eye look wet and alive. The whites of the eyes (sclera) are rarely pure white. They will have subtle shadows, especially near the eyelids and in the corners, to show their spherical form. The eyelids themselves will cast shadows onto the eyeball. Use a soft pencil to build up layers of graphite, gradually increasing the darkness in shadowed areas. You can use a blending stump or even your finger (though be careful of smudging) to smooth out transitions and create a soft, realistic look. Drawing an eye with only one pencil, like a Doms (Zoom Ultimate Dark) pencil, can be a fantastic exercise in mastering value and pressure to create a full range of tones, from the lightest highlights to the deepest shadows. Remember, realistic eyes are all about subtle variations in tone and texture.Exploring Different Eye Styles: Beyond Realism
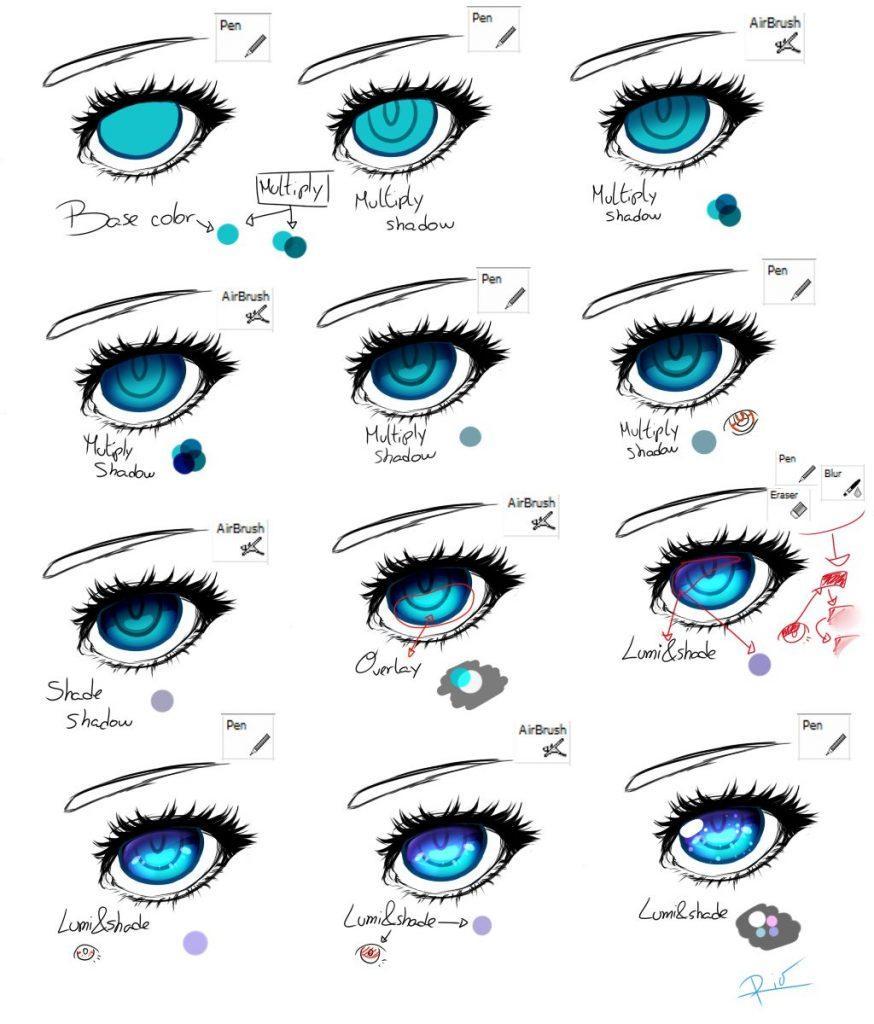
Remember, eye styles vary vastly. Depending on whether your expertise is anime, realism, comics, or doll eyes, the approach to drawing eyes will differ significantly. This tutorial aims to teach you how to draw realistic eyes and anime eyes, providing a versatile foundation for your artistic journey. While the core anatomy remains the same, the simplification and exaggeration of features change drastically between styles.Drawing Anime Eyes: Simplified Expression
Anime eyes are known for their large, expressive, and often simplified forms. They typically feature exaggerated highlights, larger pupils, and fewer anatomical details compared to realistic eyes. The focus is on conveying emotion through shape and vibrant color. To draw anime eyes, you'll still start with a basic shape, but it might be much larger and more stylized. The iris and pupil will be prominent, with multiple, often geometric, highlights to give them a sparkling, energetic look. Eyelashes are usually drawn in clumps rather than individual strands. The beauty of anime eyes lies in their ability to convey strong emotions with minimal lines, making them a fun and rewarding style to learn after mastering the basics of how to draw eyes easy.Realistic Eyes: Capturing Every Detail
Drawing a realistic looking eye in nine steps, as some detailed tutorials suggest, involves a deeper dive into texture, subtle shading, and fine details. While our 5-step method provides the structural foundation, achieving true realism means adding layers of complexity. This includes meticulously rendering the intricate patterns of the iris, the subtle veins in the sclera, individual eyelashes (which often grow in multiple layers and directions), and the delicate folds of skin around the eye. Learn how to draw a realistic eye using these easy step by step instructions by focusing on observation. Observe real eyes, photographs, and detailed anatomical references. It includes detailed illustrated examples and provides simple explanations to go along with them, guiding you through the nuances of light reflection, shadow casting, and the delicate interplay of different textures. The goal is to capture not just the shape, but the very essence of a living eye.Common Pitfalls to Avoid When Drawing Eyes
As you practice how to draw eyes easy, you might encounter some common challenges. Being aware of these can help you avoid them and improve your drawings significantly. 1. **Making the Iris a Perfect Circle:** While the iris *is* a circle, it's rarely fully visible. Beginners often draw a complete circle, which makes the eye look startled or unnatural. Remember, the eyelids usually cover the top and bottom portions. 2. **Flatness:** Forgetting that the eye is a sphere can lead to flat, lifeless drawings. Always think of the eyeball as a ball, and the eyelids wrapping around it. This understanding is key to applying proper shading and creating depth. 3. **Symmetry Over Realism:** While eyes are generally symmetrical, no two eyes are perfectly identical, and expressions can make them appear slightly different. Don't strive for mirror-perfect symmetry; embrace subtle variations. 4. **Neglecting the Whites of the Eyes:** The sclera (whites) are not pure white. They have shadows from the eyelids, reflections, and sometimes subtle veins. Shading them appropriately adds immense realism. 5. **Eyelashes that Look Like Fences:** Eyelashes aren't straight, evenly spaced lines. They curve, clump, and vary in length and thickness. Observe how they grow from the eyelid and fan out. 6. **Ignoring the Surrounding Area:** The eye doesn't exist in isolation. The brow bone, nose bridge, and cheekbones all influence how light and shadow fall on and around the eye. Including these elements, even subtly, helps ground the eye in the face.Practice Makes Perfect: Your Journey to Mastery
Learning how to draw eyes easy is a journey, not a destination. The more you practice, the more intuitive the process will become. Today, I've shown you a foundational way to draw eyes. I encourage you to try out these drawing techniques. Don't be afraid to experiment with different angles, expressions, and lighting conditions. Try drawing eyes from photographs, from life, and from your imagination. Explore different styles as well. Today I’ll be showing you six different ways to draw eyes, from the realistic to the stylized, to broaden your artistic horizons. The key is consistent practice and keen observation. Look at the eyes of people around you, in magazines, and online. Notice the nuances of their shapes, the way light catches the iris, and the subtle expressions conveyed. I'd absolutely love to see what you create! Tag me if you try any of these drawings out and comment your favourite eye below! Your artistic growth is a continuous process of learning, experimenting, and enjoying the creative journey.Last Updated & Future Learning
This guide was last updated on September 2, 2024, ensuring you have the most current and effective techniques at your fingertips. The world of art is constantly evolving, and so too should your skills. Continue to seek out new tutorials, observe the work of other artists, and never stop experimenting. Whether you're aiming for an easy way to draw a realistic eye for beginners step by step (using only 1 pencil) or mastering complex portraits, the principles outlined here will serve as your unwavering foundation. Keep drawing, keep learning, and most importantly, keep enjoying the process of bringing your artistic visions to life.