Are you looking to capture that perfect snare drum crack for your next Instagram reel, perhaps with the trusty Shure SM57? It's a common quest for drummers and home recordists, and honestly, getting that sound just right can feel like a bit of a puzzle. Many folks have questions about snare mic placement, and it's a topic that comes up a lot. You see, making a quick video often seems easier and more helpful than trying to explain it all through endless text messages, so we're going to break it down for you here.
The Shure SM57 has, in some respects, been a go-to for miking snare drums for a very long time, pretty much dominating for the best part of 50 years, actually. It's possibly the most used microphone on the planet, and for some good reasons, too. If you've just got your first microphone, and it happens to be an SM57, and you want to record drums with it, you're in good company. This guide will help you understand how to get a great sound, whether you're new to miking up your set or just seeking a little refinement.
We'll talk about different ways to position your SM57, aiming to get that distinct snare sound while trying to limit it picking up so much of everything else around the drum kit. It's a common issue, you know, when you're trying to record just the snare, but you hear all the cymbals too. We'll give attention to how small adjustments can make a big difference, so you can really hear the nuances. Plus, we'll touch on using just one mic for your whole set, which is a pretty common scenario for many home setups, and how to perhaps mix it to get the best overall sound. Thanks so much for all your questions, by the way.
Table of Contents
- The SM57: A Drummer's Friend
- Basic Top Snare Mic Placement
- Exploring Other Placements
- Taming the Bleed Monster
- Recording Your Whole Kit with One SM57
- Fine-Tuning Your Snare Sound
- FAQs About Snare Mic Placement
- Conclusion: Your Snare Journey
The SM57: A Drummer's Friend
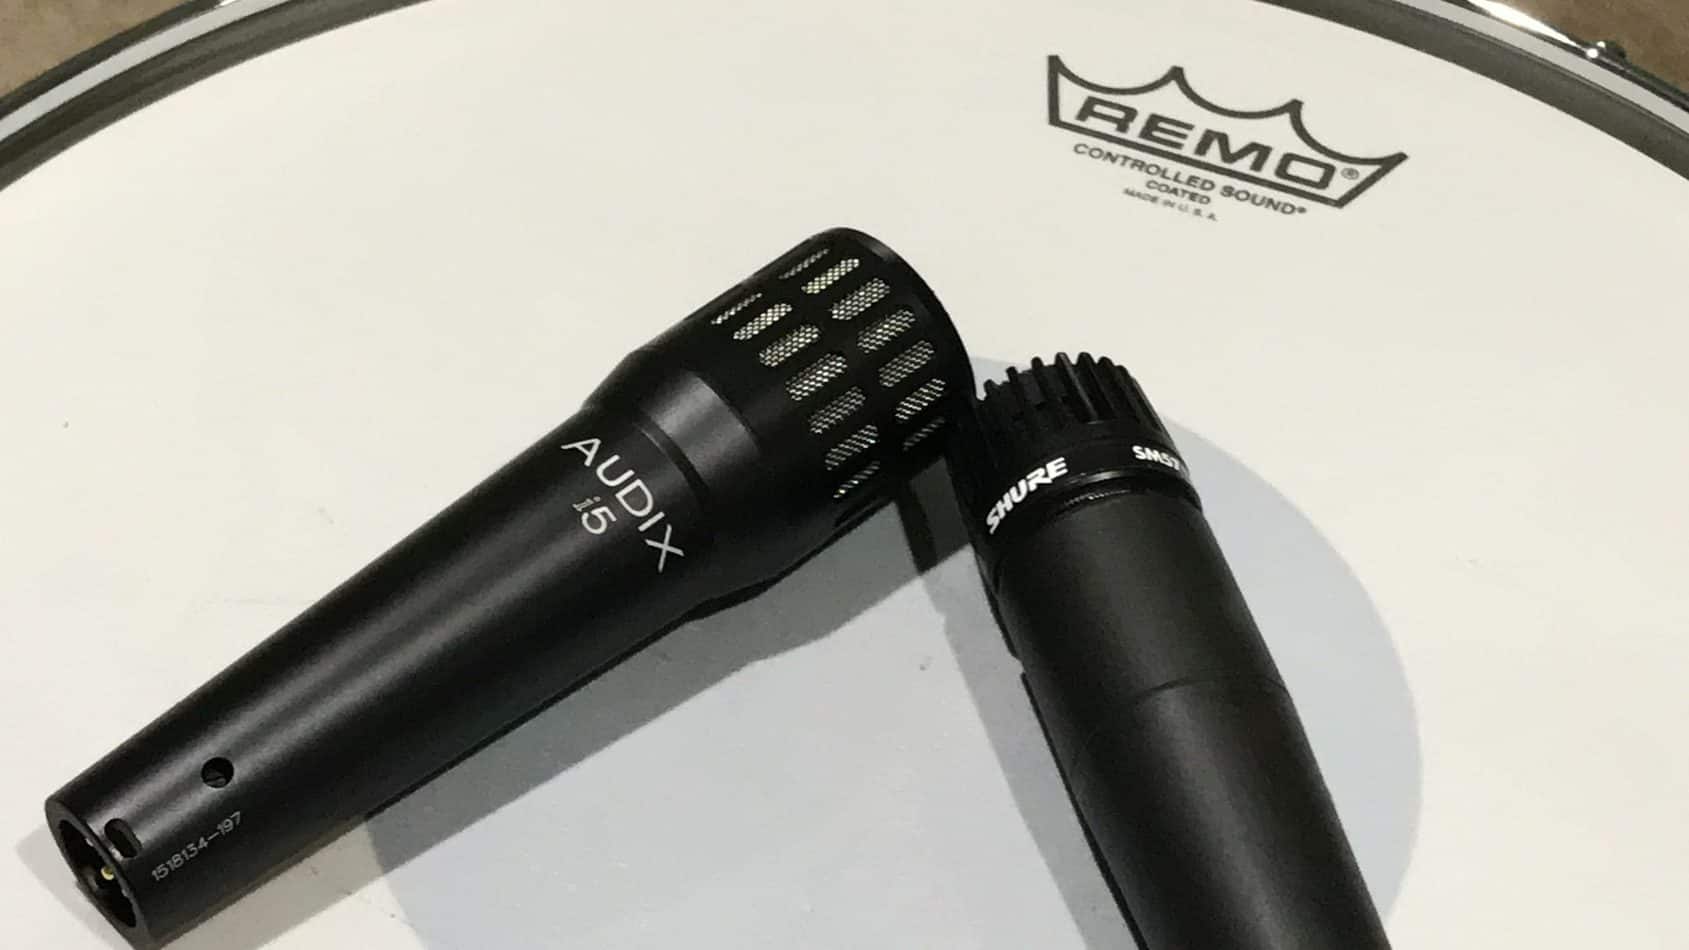
The Shure SM57 is, arguably, a bit of a legend in the recording world, especially for drums. It's a dynamic microphone, which means it sounds a bit different than any condenser mics you might have heard about. Dynamic microphones, you know, don't need phantom power, which is a nice thing to consider, making them very simple to set up. Many people, myself included, really like the SM57 on snare drums; it just has a certain punch to it, and for some, it's the only mic they have for snare, so it's good to know how to get the most out of it.
This mic's durability and ability to handle loud sounds make it a natural fit for drums. You see, the snare drum itself, with its sharp, staccato sound from those stiff wires held under the bottom head, really benefits from a mic that can capture that impact without distorting. The SM57 is quite good at this, and with some effort, you'll generally get a great sound. It's pretty much a workhorse in studios everywhere, which is why it's so popular, actually.
Basic Top Snare Mic Placement
When it comes to snare mic placement, the most common spot for an SM57 is usually above the top head. This is where you capture the initial attack and the main body of the drum's sound. You're aiming to pick up the stick hitting the batter head, which is the top one, and some of the drum's resonance. This position is a great starting point for almost any recording situation, especially if you're just beginning to mic up your kit, you know.
Angle and Distance Explained
For a classic snare sound, many people start by placing the SM57 about one to two inches from the rim of the snare drum. You want the microphone capsule to be pointing towards the center of the drum head, or slightly off-center, more or less. The angle is pretty important here; usually, it's angled down at about 45 degrees, which helps to capture the stick attack and the drum's tone in a balanced way. This angle also helps to reduce how much sound from the hi-hats gets into the snare mic, which is a common problem, honestly.
With regard to adjustments, I've had decent results by positioning the mic similarly, but raising it an inch or so, and angling it down to point through the batter head at the snare wires. This can give you a bit more of that "snare" sound, that sizzle from the wires, mixed in with the drum's main hit. It's a subtle change, but it can make a noticeable difference in the overall character of the sound, so try it out.
Aiming for the Sweet Spot
Finding the sweet spot for your SM57 is really about listening. Every snare drum, you know, is a little different, and even the way you hit it changes things. Start with the basic placement, then play the drum and listen. Move the mic a little closer, then a little further away. Change the angle just a bit. Can you hear the difference? You're listening for the right balance of attack, body, and snare wire sizzle. It's like finding the perfect balance in a recipe, you know, just a little bit of this, a little bit of that.
If the sound is too thin, you might need to move the mic a little closer to the center of the drum head. If it's too boomy, try moving it closer to the rim. It's all about small adjustments and immediate listening. This process, actually, is quite fun, and it really helps you learn what sounds good to your ears. Remember, the goal is a sound that feels right for your music, so keep experimenting with placement, and you'll get there.
Exploring Other Placements
While the top-head placement is a solid start, the SM57 is versatile enough to try other spots, too. These alternative placements can offer different sonic characteristics, which might be exactly what you need for a specific song or a particular drum sound. It's worth trying them out, especially if you're aiming for something a little unique for your Instagram reel.
The Shell-Side Sound
Have you ever thought about miking the snare shell? Some people do, and it can give you a rather interesting sound. Placing the SM57 aimed at the side of the snare drum, perhaps parallel to the floor and a few inches away from the shell, can capture more of the drum's woody or metallic resonance. It's a different vibe compared to the direct hit you get from the top. SM57 shell versus top placement: what do you think of the sound of a mic’d snare shell? It's a question worth asking yourself, honestly.
This placement can be useful if you want a less direct, more ambient snare sound, or if you're blending it with a top mic to create a fuller picture. It's less common as a primary snare mic position, but it's a good trick to have in your bag. Experiment with the distance from the shell and where along the shell you point the mic; you might find a sweet spot that really works for your style, you know.
Underneath: The Snare Wires
To really emphasize the "snare" part of the snare drum, many engineers place a second microphone underneath the drum, pointing up at the snare wires. While you might use a different mic for this, an SM57 can work here, too. You'd typically position it a few inches from the bottom head, directly below the snare wires, pointing upwards. This position captures a lot of the sizzle and crackle from the wires, which is crucial for that characteristic snare sound.
When using an under-snare mic, you'll often flip the phase on the microphone's channel on your mixer or audio interface. This is because the top and bottom heads move in opposite directions when struck, and flipping the phase helps to avoid phase cancellation, which can make your snare sound thin or hollow. It's a common practice, and it really helps to make the two mics work together, you know, rather than against each other.
Taming the Bleed Monster
One of the biggest challenges when miking a snare drum, especially in a home studio setup, is limiting how much of everything else the mic picks up. This is often called "bleed," and it's particularly noticeable with cymbals. I've got an SM57 on my snare for recording, and I'm new to miking up my set in general, but can anyone offer any tips to placement of the mic to limit it picking up so much of everything else? This is a question we hear a lot, actually.
The 45-degree angle we talked about for top placement is your first line of defense against cymbal bleed. By pointing the mic slightly away from the hi-hats and crash cymbals, you're using the microphone's directional pattern to your advantage. Dynamic microphones, like the SM57, are pretty good at rejecting sounds from the sides and rear, which is a big help. You can also try positioning the snare drum itself so that your cymbals are not directly over the snare mic, which, you know, can make a difference.
Gating and EQ Basics
Beyond physical placement, you can use processing to help with bleed. A noise gate is a tool that basically mutes the microphone signal when it falls below a certain volume level. This means the snare mic will only be "open" when the snare drum is actually hit, helping to cut out cymbal wash or other drum sounds when the snare isn't playing. You have to be careful with gates, though, as they can sometimes cut off the snare's natural decay if set too aggressively, so experiment a little bit.
Equalization, or EQ, can also help. If you're getting too much cymbal harshness in your snare mic, you can try gently cutting some of the higher frequencies on that channel. Conversely, if your snare sounds a bit thin, you might boost some mid-range frequencies to give it more body. Remember, these are subtle adjustments; you're just shaping the sound, not drastically changing it. There's a lot to recording, you know, from the technique of the player to the final mix.
Recording Your Whole Kit with One SM57
What if you only have one SM57 and want to record your whole drum set? This is a very common scenario for people just starting out, and it's totally possible to get a usable drum sound with just one mic. You won't get the isolated control of a multi-mic setup, but you can capture the overall feel and energy of the kit. Any tips for mic’ing the whole set with just one mic? Yes, we've got some ideas for you.
Overhead Placement for Balance
When using a single SM57 for the whole kit, the best approach is often to use it as an overhead or a "mono overhead" mic. This means placing the mic above the kit, looking down, to capture a balanced picture of all the drums and cymbals. A good starting point is to place the mic roughly 3-5 feet above the center of the kit, pointing down towards the snare drum or slightly towards the kick drum beater, depending on what you want to emphasize. This placement captures the entire drum set's sound as one cohesive unit, which is pretty neat.
You can experiment with the distance and position to find the spot where the drums sound most balanced to your ears. If the cymbals are too loud, raise the mic a little higher. If the kick and snare are getting lost, try moving it a little closer or aiming it slightly differently. It's all about finding that sweet spot where everything sits well together. This method is great for capturing the vibe of a performance, and it's a simple way to get started with drum recording, you know.
Fine-Tuning Your Snare Sound
Getting a great snare sound is not just about where you put the mic; it's also about listening and making small adjustments. The goal is to capture the drum's natural voice and make it sound good in the context of your music. This (specifically Brite Nitegown) is the album that inspired me to invest in my D112 and SM57; I read the Sound on Sound article about the album, and sure enough, that ridiculous snare sound was a big part of it. This shows how much a good snare sound can inspire, too.
Listen and Adjust
The most important tool you have is your ears. After you've placed the mic, play the drum, and listen critically. Is it too bright? Too dull? Does it have enough punch? Small shifts in mic placement, even an inch or two, or a slight change in angle, can dramatically alter the sound. It's a bit like sculpting, you know, where each small move shapes the final piece. Don't be afraid to move the mic around until it sounds right to you. Keep experimenting with placement, and you'll definitely find what works best.
Also, consider the player's technique. Secondly, there's a lot to the recording from the technique of the drummer. How hard they hit, where they hit the drum, and how they use ghost notes or rimshots will all impact the sound captured by the microphone. A great drummer can make almost any mic setup sound good, honestly. So, encourage the drummer to play naturally, and then adjust the mic to complement their style.
The Role of the Drum Itself
It's worth remembering that the snare drum itself plays a huge role in the final sound. A Mapex Mars 14” snare, for example, will sound different from other snares. The drum snare’s unique sound comes from the wires or “snares” that rest against the bottom head. When you strike the top head, these wires vibrate, producing a distinct crack. The tuning of the drum, the type of drum heads, and the snare wires all contribute to its character. A well-tuned drum will always be easier to mic than one that isn't, so make sure your drum sounds good before you even think about placing a mic.
The snare drum, or side drum, is a percussion instrument that produces a sharp staccato sound when the head is struck with a drum stick, due to the use of a series of stiff wires held under the bottom head. These metal wires or "snares" stretched across the bottom head are what give the snare drum its characteristic sound. Understanding this helps you appreciate what you're trying to capture with your SM57. Explore the history, construction, and unique sound of the snare drum to really get a grasp of it.
FAQs About Snare Mic Placement
Here are some common questions people ask about miking snare drums with an SM57:
What is the best way to mic a snare drum with an SM57?
The most common and often effective way is to place the SM57 about one to two inches from the rim, angled down at about 45 degrees, pointing towards the center of the batter head. This position usually captures a good balance of attack and drum body, and it helps to reject some cymbal bleed, too. However, the "best" way really depends on the specific drum, the player, and the sound you're aiming for, so experimentation is key, you know.
How do I reduce cymbal bleed when miking a snare with an SM57?
To reduce cymbal bleed, start with the 45-degree angle mentioned above, as this uses the SM57's directional properties to your advantage. You can also try moving the mic slightly further from the cymbals or adjusting the drum's position in relation to them. In your recording software, you might use a noise gate to only let the snare sound through when it's played, or use EQ to cut harsh high frequencies that might be coming from the cymbals, which is pretty helpful.
Can I record a whole drum set with just one SM57?
Yes, you absolutely can record a whole drum set with just one SM57. The most common method is to use it as a mono overhead mic. Place the SM57 above the kit, roughly 3-5 feet high, pointing down towards the center of the kit, perhaps